Category Archives: My Favorite Recipes

Smoky Cauliflower Frittata

I love my garden and I love my CSA, both of which I treasure for the fresh, delicious, seasonal food they bring into my kitchen.  But I have to admit to a guilty pleasure: the off season.  When I get to select each and every vegetable myself just because I feel like eating it this week.  When I don’t have a bumper crop of arugula or zucchini demanding that I make pesto or relish.  When I don’t have to resist buying some enticing vegetable because my CSA box is groaning under the weight of other harvest bounty.  (I know, some people have real problems, right?)

So anyway, this week, I just up and bought two heads of cauliflower.  I did!  And after you make this frittata for the first time with the reasonable single head of cauliflower you will no doubt purchase at first, I am pretty sure that you will hurry back to the store for two more heads of cauliflower as well.  Just in case you have to make the frittata twice more in rapid succession.  Which might be my plan.

The smokiness here comes from a combination of smoked cheese and smoked paprika, another could-be-overkill-but-isn’t epiphany from the Ottolenghi cookbook Plenty.  I wouldn’t normally say that smoked cheese is my thing, but this frittata is something.  Something good.  J says it tastes meaty.  He means that as a compliment.

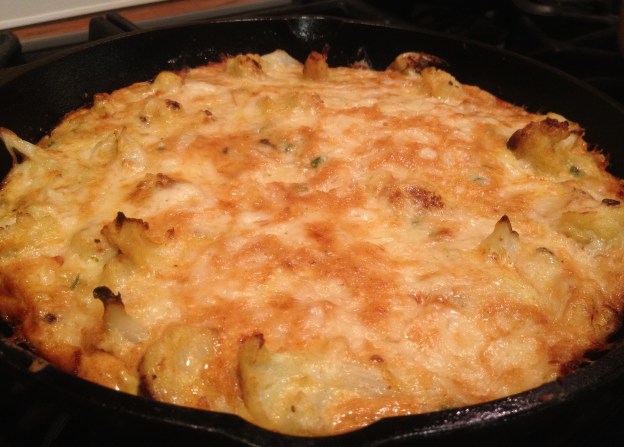
This Smoky Cauliflower Frittata would be excellent at any meal, and it is flavorful enough that you could cube it up to serve as a bite-sized party snack (or, you know, a straight-from-the-fridge snack).  In salted water, parboil a small cauliflower, including the stem, cut into medium pieces.  Drain well, then saute in an ovenproof pan with 2 Tbsp. olive oil until the edges of the florets begin to turn golden brown.  Meanwhile, heat oven to 375 and grate and toss together 5 oz. smoked cheese (I used Beechers) and 2 oz. aged cheddar.  In a large bowl, thoroughly combine 6 eggs, 1/4 c. greek yogurt (the original recipe called for creme fraiche), 2 Tbsp. dijon and 2 tsp. sweet smoked paprika, then stir in 3 Tbsp. finely chopped chives and 3/4 of the grated cheese (reserve the remaining cheese for later).  Season well with salt and pepper.  When the cauliflower florets look nice and toasty, pour the egg mixture over the cauliflower and use a fork to distribute the cauliflower and cheese evenly around the pan. Cook about 5 minutes over medium heat.  Scatter remaining cheese on top, move to oven, and cook 10-12 minutes more until the frittata is nearly set.  I like to finish by turning the oven up to a broil for a couple of minutes at the end (leaving the pan on the middle rack) to slightly brown the top.  Let rest a few moments, then serve hot.  (Most frittatas are also great cold or at room temperature, but I preferred this one hot.)  I served it with a plain green salad dressed with this lemony vinaigrette.

Celebrate Spring with a Canning Jar Coddled Egg

Welcome to Emmy Cooks! If you like what you see here, you can sign up on the sidebar to receive recipe updates by email, add the RSS feed to your blog reader, or follow Emmy Cooks on Facebook, Twitter, or Pinterest.

I admit that, at first, I found Seattle a bit too grey. It took me a few years to stop minding the weather and learn to love soup. But that was more than a decade ago, before I realized that it doesn’t rain that much, and when the sun shines it’s incomparably gorgeous. And now I just think of Seattle as having five months of springtime. Starting today.

So happy springtime! Right on schedule, my hens laid their first two eggs of 2012, and when I poked around in the garden I found soft green herbs unfurling from hibernation. The first chives, tender parsley, tart sorrel, green onion shoots, mint. Lunch.

When I read this the other day, I couldn’t believe that it had never occurred to me to coddle an egg in a canning jar. (Is that weird? Really, I couldn’t believe it.) So, as I said, lunch.

To make a Coddled Egg in a Canning Jar, butter a wide mouth half pint canning jar. Crack in two eggs and season with a pinch of salt. I drizzled in a spoonful of cream because I had some in the fridge, then piled in the handful of chopped fresh herbs. You wouldn’t go wrong adding cheese instead of the cream (or, go crazy, use both), but I didn’t. Put the lid on the jar and place it in a pot. Fill the pot with water to just below the jar lid. Remove the jar from the water, bring the water to a simmer, put the jar back in, and simmer 12-15 minutes, depending on how well-cooked you want your yolks. (Think ahead of time about how you will lift the jar from the simmering water. I used a jar lifter, which I own for canning, but I’ve heard of people using tongs with the ends wrapped in rubber bands for traction. If you plan to use this method, you should probably try it first in cold water to make sure it seems safe.)

I love the idea of serving these for brunch with a toppings bar–label the lids with a Sharpie and let everyone assemble their own. With a few pots on the stove you could cook a lot of these at once. Serve with buttered toast.


My Favorite Recipes: January 2012

Don’t worry if you’ve missed a post or two this month, or been torn by so many options–in no particular order, these recipes have been my January favorites.

Zippy Noodle Curry with Tofu, Sweet Potatoes, and Chard


Sunny Side Up Pizza with Potatoes and Eggs


Chocolate Chocolate Chocolate Cookies (although if you want to be eating cookies in 20 minutes, these Easy Little Butterscotch Cookies/Nutella Sandwich Cookies are the way to go)


Winter Vegetarian Chili


and, of course, The Best Soup of 2011


Finally, the crowd favorite (as chosen by most page views): Sweet Potato Pancakes for Someone You Love


Happy Cooking!

This Weekend, Make Sweet Potato Pancakes for Someone You Love

It’s never the wrong time to make sweet potato pancakes for someone you love.  So make them this weekend.  Or you could file these pancakes away for Valentines Day.  Or, better yet, make them the next three weekends in a row to perfect your technique, THEN make them for Valentines Day.  If you’re cutesy like that, you can shape your pancakes into a heart using a cookie cutter or pancake mold, or you can use a squeeze bottle of batter to bake a heart-outline shape.  If you’re not cutesy like that, these are still great pancakes to make for the ones you love because they’re healthy for the ol’ ticker, full of beta carotene and whole grain goodness.  And they have “sweet” in the name.

Anyway, my kids found MY heart-shaped pancake mold (where did THAT come from?) in a bag of Valentine-making supplies a few days ago.  They have been requesting heart-shaped pancakes for breakfast every morning since.  But anyone who knows me knows that I don’t roll that way.  Instead, like this writer, I stay up way too late and come morning it’s all I can do to roll out of bed in time to (drink a pot of coffee and) get the kids out the door.  So the idea of pancakes on a weekday, unless J makes them during his cheery morning revelries with the children, is a no-go.

Enter Breakfast For Dinner.  I told you how we mostly just ate scrambled eggs for a while there, so pancakes for dinner shouldn’t be such a big deal, but the kiddos were gleeful.  That’s always nice.

To make these Sweet Potato Pancakes, first peel, dice, steam and then mash or puree one large sweet potato.  That sounds like a big deal, but it’s not.  Just get it started while you mix the rest of your ingredients.  In a large bowl, mix 1 c. all-purpose flour, 1 c. whole wheat flour (pastry if you have it), 4 tsp. baking powder, 1 ½ tsp. cinnamon and a big pinch of salt.  In a separate bowl, whisk 2 eggs with 2 c. milk, 4 tsp. canola oil, 2 Tbsp. brown sugar and 1 tsp. of vanilla.  Whisk in that sweet potato puree, then mix into your dry ingredients until blended.  Bake on a buttered griddle for a buttery crispy crust.

Serve with your favorite pancake fixings.  Mine–with these pancakes, at least–are vanilla yogurt, toasted pecans and a drizzle of maple syrup.  Yours?

p.s.  Did you know you can replace the butter/oil in lots of baked goods with sweet potato puree?

p.p.s. Save some pancake batter in the fridge.  You might want to make these again for dinner.

Sunny Side Up Pizza With Potatoes and Eggs

Making pizza is often an improvisational affair at our house.  There are tried-and-true combinations that we like, sure, but often we decide to get a pizza crust going before we check out what’s in the fridge.  One of our usual favorites is a potato pizza, and if you think that doesn’t sound delicious, please go straight to Tom Douglas’s Serious Pie and then stand corrected.  (If you don’t like it, which I believe to be impossible, you’ll still have lots of other amazing options to choose from.  Pro tip: go with a crowd at happy hour when they make mini pizzas so you can try them all.)

This post is not about potato pizza, however.  Because after J roasted a pound of thinly-sliced fingerling potatoes until nearly crisp, I made the mistake of piling them within the children’s reach, where the heap of “chips” was quickly decimated.  So I’ll give you a recipe for potato pizza another time.

Left with only a handful of potatoes, it was back to the fridge, and this Sunny Side Up Pizza was born.  Crank your oven as hot as it goes and put in a pizza stone if you have one.  Layer your thin pizza crust (recipe here if you want one) with thinly-sliced potatoes (first roasted at 425 until just beginning to crisp) and a sprinkling of mozzarella. Pile on chunks of goat cheese and a big handful of rinsed capers.  We crumbled on some smoked salmon, but you could skip that step and just go with a big sprinkle of salt over the whole pizza if you prefer.  Finally, we broke two eggs over the pizza, but they were so good that we later wished we’d used four.  Getting the eggs perfect will depend on your oven temperature and how thin you stretched your crust (because that has to cook through, too), so you might need to experiment a little.  Baked in our oven at 550 for almost 6 minutes, the whites were set and the yolks were lusciously runny, perfect for wiping up with the last piece of pizza crust.

We served the pizza with a simple green salad with Creamy Pear Vinaigrette and bowls of leftover Cauliflower Soup–which, like most soups, was even better after a day in the fridge.

Chocolate Chocolate Chocolate Cookies

Ok, so maybe they’re only Chocolate Chocolate Cookies.  The point is, they’re CHOCOLATEY.  I love chocolatey.  At this point I could say something like, “but given their dimunitive size (as compared to one of those cake-sized cookies you could get at the mall in the 1980s, say, or a watermelon), they make a perfect sweet bite after dinner or a nice after-school snack for the children with a glass of milk.”  But that would be disingenuous.  Because, let’s be honest, what I really plan to do with these cookies is sit down and eat a whole plateful.  Or at least two.

I have been thinking about a good chocolate cookie since I saw this post the other day.  I have made, and I do love, that cookie recipe.  But these are something a little different.  The Clinton Street Bakery Cookbook calls them “Brookies,” as in a cross between a brownie and a cookie, and the description is pretty perfect.

Perfectly chewy, with a crispy edge, these Chocolate Chocolate Chocolate Cookies are worth getting 3(!) bowls dirty for.  First, combine 1 c. chocolate chips, 1 Tbsp. canola oil and 1 tsp. butter and melt in the microwave or a double boiler.  In a large bowl, whisk 2 eggs with 3/4 c. brown sugar and 1 tsp. vanilla.  In a third bowl, combine 1/2 c. flour, 1/4 tsp. baking powder, and 1/4 tsp. salt.  Fold the chocolate mixture into the egg mixture, then stir in the flour mixture.  Fold in another c. of chocolate chips, then pop the batter in the freezer for about 10 minutes to firm up.  Bake well-spaced 1-Tbsp. scoops of dough on parchment or a buttered cookie sheet at 350 just until the tops are dry and cracked, about 8-10 mins.  Let cool completely before attempting to move (read: eat) them.

Winter Vegetarian Chili

The chili purists bicker about beans, no beans, veggies, no veggies, whatever.  This recipe is not for them.  They’d flip out over this one. It’s smoky, meaty, tomato-y, all the things a good chili should be–but it’s vegetarian.

This is a secret, shh, but this chili has wheat berries* in it.  I know, it’s crazy.  But they’re great.  They are combined with black beans to give the chili texture and rib-sticking density, while the flavor is anchored by chipotles and cumin and elevated by lime and cilantro at the end.  This is my go-to winter chili.

To make this Winter Vegetarian Chili, start by cooking about a cup of wheat berries in water to cover by an inch and a teaspoon of salt.  (Cooked wheat berries freeze well, though, so why not make more while you’re at it?)  Bring them to a boil and simmer for about an hour, until pleasantly chewy.  Meanwhile, get your chili going: saute a chopped onion with a chopped red pepper for a few minutes, then add 5 minced cloves of garlic, 1 tsp. oregano and 2 tsp. each of chili powder and cumin.  Once the spices start to get toasty, stir in 1-2 tsp. of pureed chipotles until fragrant (I buy canned chipotles in adobo and puree the whole can with the adobo sauce; the puree keeps in the fridge forever, as far as I can tell).  Then add a big can of chopped tomatoes, 3-4 c. of cooked or canned black beans (with some of their liquid, if you cooked them yourself), some of the liquid from the cooked wheat berries, a Tbsp. of brown sugar and salt and pepper to taste.  Simmer for a while and then add your drained cooked wheat berries and cook for a few minutes longer.  Squeeze in a whole lime at the end.  I first found this recipe in Eating Well, which basically means it’s health food.  But don’t let that stop you from topping your bowl with some grated cheese and sour cream in addition to avocado, a lime wedge and cilantro.  And you can never go wrong with a chunk of corn bread.

*What’s a wheat berry, you ask?  It’s the whole wheat kernel, it looks a little like brown rice, and it cooks up into a nutty, chewy, delicious little bite of good-for-you-whole-grain.  Wheat berries make great salads, I’ll tell you about that another time.  And when you’re shopping for them, pick hard red wheat berries instead of soft white ones–but if white wheat berries are all you have, don’t worry, they’ll work just fine.

Zippy Noodle Curry with Tofu, Sweet Potatoes and Chard

J and I spent a week taking cooking classes in Chiang Mai once when we were kicking around Thailand for a few months.  (We also spent a week taking foot massage classes in Bangkok.  Both were pretty nice weeks.)  We love Thai food and occasionally dig into the freezer and pantry to bring the scents and flavors of Thai cooking into our home.

One of my favorite foods in Thailand was a rich, creamy noodle curry called khao soi.  This is not a recipe for khao soi.  You should definitely get yourself a bowl if you find yourself in Chiang Mai, though.  THIS is a very simple recipe based on the Big Curry Noodle Pot recipe in Heidi Swanson’s Super Natural Cooking.

In Zippy Noodle Curry with Tofu, Sweet Potatoes and Chard, “zippy” refers to both the flavors and the speed of making the dish.  (I’m funny, huh?)  Saute an onion, 1 big cubed sweet potato (I steamed mine first, but I think it was unnecessary) and some chopped garlic in a glob of heavenly-smelling coconut oil with 1-2 Tbsp. red or yellow curry paste.  Add a cubed block of extra-firm tofu and a few handfuls of chard leaves sliced to ribbons and stir to coat.  Pour in 2 c. veggie stock, 1 can of lite coconut milk, 2 tsp. turmeric, 2 Tbsp. soy sauce, and 1 Tbsp. sugar and simmer until the sweet potatoes are soft.  Meanwhile, cook 8 oz. fresh egg noodles in a separate pot.  Add cooked noodles and the juice of a lime to the curry.  Garnish with chopped cilantro, green onions and peanuts, and serve with chopsticks and a spoon.  Thai chile flakes, soy and/or fish sauce, and lime wedges at the table will let everyone perfect the dish according to their own taste.

The Best Soup of 2011

I’ll give you that it’s 2012 already.  But when this soup showed up on 101 Cookbooks recently, it reminded me of how much we loved it last year.  Friends came over for dinner and I made a few little things to go along with it, too.

First, Nash’s Field Pea or (if you don’t have Nash’s Field Peas, poor you) Split Pea Soup with Curried Brown Butter: I, myself, like to make a big pot of soup–enough to serve unexpected company or to have leftovers for the freezer.   So you could scale this down if you prefer a smaller quantity.  Saute 2 big onions, 6 minced cloves of garlic, and 1/2 to 1 tsp. red pepper flakes in a knob of butter.  When soft, add 3 c. field peas (well sorted and washed and soaked overnight)–or, once the field peas run out, green split peas.  Add 3 quarts water, bring to a boil and simmer until soft.  If you’re using split peas or lentils this might take 30-60 minutes.  If you’re using last year’s field peas from Nash’s, it might take all day.  When the peas are soft, mix in 2 tsp. salt and 1 can light coconut milk.  Puree well, then add additional salt to taste.  In a separate pan, brown 1/4 c. butter, then sizzle in 4 tsp. Indian curry powder for one minute.  Mix most of the curried brown butter into the soup, then serve bowls drizzled with the remaining curried butter and chopped chives.

This Easy Little Bread is just as its name implies and goes great with (butter or cheese and) soup.  Dissolve 2 tsp. yeast in 1 1/4 c. warm water, then mix in 1 Tb. honey.  Meanwhile, mix 1 c. all-purpose flour, 1 c. whole wheat flour, 1 c. oats and 1 1/2 tsp. salt in a large bowl.  Mix wet ingredients into dry until well combined, then scoop dough into a buttered loaf pan.  Let rise for 30 minutes, then bake for about 40 minutes at 350.  Cool on a cooling rack.

A Lemony Kale Salad kept the meal from being too brown: Chop 1 washed, stemmed bunch of kale to smithereens in a food processor.  Toss in a handful of currants and a handful of toasted pine nuts.  Mix up a dressing of 1/4 c. lemon juice, 1/4 c. olive oil, 1/4 c. microplaned parmesan, a minced small clove of garlic, and salt and pepper to taste.  Toss it all together with more parmesan.

And finally, a Meyer Lemon Olive Oil Cake, made from lemons we picked from the tree outside the window when were in California last week.  It’s from Rustic Fruit Desserts, and it’s a family favorite (we call it “glaze cake”).  First, preheat the oven to 350 and coat a 9″ cake pan with olive oil, then granulated sugar.  Beat 3 room-temperature eggs, 3/4 c. sugar, and the zest of 5 Meyer lemons at high speed for 5 minutes.  Meanwhile, in a small bowl, combine 1 1/4 c. all purpose flour with 1/4 tsp. salt and 1 tsp. baking powder.  Mix 1 1/2 tsp. vanilla into the egg mixture, then add 1 c. olive oil while the mixer is running at low speed.  Add flour mixture just to combine, then scoop it into the pan and bake for 25-30 minutes.  Glaze with 3/4 c. powdered sugar mixed with 2 Tbsp. Meyer lemon juice.