Tag Archives: DIY

Savory Shortbread: Parmesan and Black Pepper Crackers

My grandfather is visiting me in Seattle this week along with my parents.  He is 98 and just the way I hope to be if I am ever that age.  Fit, happy, and he always has something nice to say about everyone and everything.  And he is something of a gourmand.

We are four generations under one roof when everyone is home, and I try to be mindfully grateful for this time together.  But while one half of my brain is enjoying the sight of my grandfather laughing at my baby’s hysterical giggles, the other half is thinking ahead to happy hour.

Happy hour was a religious observance in my grandparents’ home.  Five o’clock?  Drinks magically appeared, ice cubes tinkled in glasses, salty snacks graced the coffee table, everyone stopped what they were doing and came together.  Time has not diminished my grandfather’s appreciation of this ritual, and why should it?  It’s never a bad idea to wind down your day with a tasty beverage and the people you love.

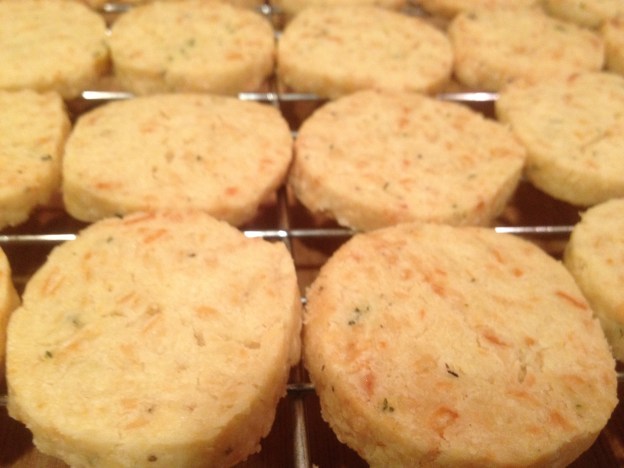
These crackers, really a savory shortbread, are perfect cocktail hour fare.  I’ve also made my grandpa those rye crackers, of course.  This recipe is Ina Garten’s.  You need to allow at least 30 minutes to chill the log of dough, or you can make the dough ahead of time, freeze it for a month or two and then just let it defrost slightly before slicing and baking.Parmesan and Black Pepper Crackers: Start by softening a stick of butter in your mixer.  Add 3/4 c. grated Parmesan, 1 1/4 c. flour, 1 tsp. fresh thyme leaves, 1/4 tsp. kosher salt, and 1/2 tsp. freshly ground black pepper.  Mix again.  If the dough is too dry (if it doesn’t form crumbs when pinched together), mix in a few spoonfuls of water or milk.  Turn the dough out onto a piece of plastic wrap, shape into a 13″ log, wrap well and freeze for 30 minutes.  Slice about 1/4″ thick and bake on an ungreased cookie sheet at 350 for 20-25 minutes, until the crackers begin to turn golden brown.  Cool completely on a wire rack.  Serve at happy hour.

Homemade Rye Crackers with Apricot-Chevre Spread

Welcome to Emmy Cooks!  You can see some of my favorite recent recipes by clicking the “My Favorite Recipes” category on the sidebar (here are June, July, and August).  If you like what you see here, you can sign up on the sidebar to receive a daily recipe by email, or follow Emmy Cooks on Facebook, Twitter, or Pinterest.

I buy a lot of foods in bulk from my local co-op.  I think they are cheaper and maybe fresher that way, with much less wasted packaging.  But I never considered a benefit that I was missing out on when I skip the packaging: the recipes on the back of the bag!

Circumstances (read: laziness, since I didn’t want to make an extra grocery stop) recently required me to pick up an already-packaged bag of Bob’s Red Mill Dark Rye Flour.  I like to have rye flour on hand because I use it in my pizza dough and in bread, and someone recently made me delicious Finnish rye cookies that I want to try out soon.  And that’s how I discovered these rye crackers.

This recipe is straight from the back of the Bob’s Red Mill bag.  The crackers are thin and crisp and make a lovely little snack by themselves.  I can imagine serving them alongside a big bowl of cabbage and white bean soup.  But today we ate them in the early evening, topped with a jammy smear of apricot-chevre spread, with a glass of sparkling wine and some good friends.  I thought the combination was rather nice, myself.

To make Rye Crackers: In a medium bowl, mix 1/2 c. all-purpose flour, 1/2 c. rye flour, 1/2 tsp. salt, 1 Tbsp. Turbinado sugar, 1 tsp. baking powder and 2 tsp. caraway seeds.  Add 4 Tbsp. butter and work into the dough until crumbly (I recommend using your hands to pinch and rub the butter into the dry ingredients).  Stir in 3 Tbsp. milk.  Form dough into two balls and roll each out to 1/8-1/16 inch thickness between two sheets of waxed paper.  Cut into desired shapes and prick with a fork.  Bake at 400 degrees on ungreased cookie sheets for 5-8 mins (depending on how thin you rolled them) until edges begin to brown.  Cool on rack and, in the unlikely event that you have leftovers,  store them in an airtight container.

We enjoyed these crackers with an apricot-chevre spread, which was simply a few good spoonfuls of homemade apricot jam stirred into a few oz. of soft goat cheese.  I’m sure they’d also be good with a sharp cheddar, soft havarti, or blue cheese.

Say What You Mean With Homemade Conversation Hearts

I have to start with a few confessions here.  One: This may be the farthest thing from “real food” that will ever grace these pages.  Two: Making homemade conversation hearts is about ten times more cutesy than I am in real life.  Three: Even though I’m trying to play it cool, I secretly had so much fun making these with my three year old.

There are, I suppose, a few good reasons to make your own Valentines Day conversation hearts, especially if you happen to have time to kill and an enormous quantity of powdered sugar on your hands.  The boxed kind have no fewer than five unrecognizable ingredients.  They taste awful.  And they say things like “text me” these days.  Wouldn’t you rather personalize yours with a message like “Marry Me” or “I think we should just be friends”?Conversation Heart Cutouts emmycooks.comEasy peasy.  Enter homemade conversation hearts.  I have quite a fondness for the CakeSpy cookbook Sweet Treats for a Sugar-Filled Life, which inspired this wacky project.  And it was easier than I thought it would be.

Please note that if you are going to get crazy and make these, you should start ASAP.  The hearts need to dry for 24 hours before you can write on them.

DIY Conversation Hearts start with a small bowl, in which you combine 1/2 c. water, 2 tsp. light corn syrup, and 1/4 oz. powdered gelatin.  Whisk well, microwave for 30 seconds, then whisk well again.  Dump mixture into the bowl of your mixer with 1 c. powdered sugar (in case you’re shopping, I used almost 2 1/2 lbs. powdered sugar in all).  Turn mixer on low and slowly incorporate 2 lbs. powdered sugar, scraping the bowl down occasionally.  Turn your sticky dough out onto a surface heavily dusted with MORE powdered sugar and knead like bread dough, adding more powdered sugar as you go, until the dough is satiny rather than sticky.

Divide the dough into as many colors as you want, and knead a few drops each of food coloring and flavoring (I used almond extract) into each ball.  This step is messy; I lined my counter with parchment paper to avoid staining.  I also added more powdered sugar as I worked in the liquid color and flavor.

Roll the dough out 1/8-1/4 inch thick.  Use heart -shaped cutters (I used a set of fondant cutters) to make tiny or almost-tiny hearts.  (Smaller = more realistic. Bigger = easier to write on.)  Pinch the scraps back together and re-roll.  The original recipe said it would make 100 hearts, but it actually made a gazillion.  Really.  More than 500.

Let the hearts dry on parchment paper for 24 hours, then use food coloring markers (like Gourmet Writer Food Pens) to ink the hearts with Valentines messages that express your own true self.  If that means writing “text me,” so be it–at least the recipient will know that you really mean it.

Conversation Heart Scraps emmycooks.com

Eat Your Greens: Easy Handmade Spinach Pasta

Sometimes, as a threat, I tell my children that there were times, like maybe in the 1950s, when children weren’t even allowed INTO the kitchen.  They had to PLAY OUTSIDE until dinner was ready.  They did not ever get to help cook, and they CERTAINLY were not allowed to gambol about the cook’s feet or play frisbee with the tupperware lids to entertain the baby.  My children stare at me, slack-jawed and wide-eyed.  Being banned from the kitchen is as bad a fate as they can imagine.

In fact, many evenings when I head into the kitchen to start thinking about dinner, they beat me there, pulling their stepladders up to the counter.  “How can we help?”  They measure as we bake, pile cut veggies onto the tray to roast, push the buttons on the machines.  They find the pots, help set the table, and enthusiastically stir clouds of flour and glops of sauces right onto the floor.

So when my little chefs make a dinner request, I like to indulge them.  The other night my five year old requested stracci di pasta.  Actually, what she said, with a bordering-on-maniacal gleam in her eye, was “Mama, can we make that pasta where we get to cut it up by ourselves WITH A SHARP KNIFE?”  (Sharp knives–even not VERY sharp knives–are exciting to the preschool set.)  Indeed we could.

Homemade egg pasta is actually very easy if you have a pasta roller.  If you don’t, forget it, borrow a friend’s and then come back for the recipe.  We made ours with spinach both for the emerald color and because I want my kids to cook with and eat vegetables on purpose (as opposed to only hidden-in-their foods veggies, which seems to be a trend).  This recipe, like many of my favorites, started its life in Deborah Madison’s Vegetarian Cooking for Everyone.

Fresh Spinach Pasta starts with two c. lightly packed spinach leaves blended with two eggs until liquid.  Mix 2 c. flour with 1/4 tsp. salt in a mixer/food processor/bowl then add the liquid while stirring or mixing on low speed.  The dough will be quite crumbly but if it is unworkably dry or sticky you can adjust with a spoonful of water or flour.  Turn out onto a cutting board and knead until smooth.  Cover and let rest 15 minutes.  Cut dough into 4-6 pieces and flatten each into a rough rectangle.  Set your pasta roller to the widest setting and roll the dough through, then fold in half or thirds and roll again to continue kneading the dough.  Do this a few times, then stop folding and start thinning out the dough by running it through the machine on progressively thinner settings.  When your pasta is suitably thin, repeat with remaining dough.  Let your kids cut the pasta into stracci (“little rags”), or fold it as shown and slice into noodles.  (If the pasta seems at all sticky, flour it lightly for this step.)  Pull apart into a pile of noodles and toss with a few pinches of flour to keep the noodles from sticking.  Cook in a boiling pot of salted water for a few minutes, tasting as you go (cooking time will depend on the thickness of your pasta).

We drained our pasta and tossed it into a pan of puttanesca-style sauce: olive oil, garlic, capers, tomatoes, red pepper flakes, dried oregano, and a few more handfuls of spinach.

DIY Baby Food: Make Real Food for Someone You Love

If you don’t have a baby of your own, don’t go anywhere.  This applies to you too. Because who doesn’t love to eat baby food sometimes?  I’m KIDDING.  But if you know someone with a baby, and want to do something nice for them, you could ask if they would like the gift of homemade baby food.  Parents are always busy and anyone who offers to lend a hand is doing a public service.  It takes a village, people.

I have always been confused about why people who care what they feed themselves buy jarred food for their babies.   Even if the label says organic happy super-healthy baby food, I can’t help but imagine that the fruits and vegetables that go into the puree are not the gorgeous specimens that would otherwise be gleaming in the produce aisle.  But maybe I’m just suspicious like that.  Plus, buying baby food is expensive and making it is cheap and easy.

Here’s the big recipe for DIY Baby Food: peel and steam or roast an organic fruit or vegetable.  Puree or mash it (older babies can eat chunkier foods).  Freeze solid in ice cube trays, then pop them out into a freezer bag for storage.

Some easy classics: carrots, peas, apples, pears, winter squash, peaches.  Find something that’s seasonal and delicious.  Babies learn to love real food through these early experiences.

Today my own baby enjoyed sharing bites of tofu and egg out of my spicy bowl of pad thai, so I am thinking the days of smushed-up baby food are close to over around here.  But if I can help out a friend, you can bet I’ll be making it again soon.