Tag Archives: family

Oatmeal Cracker with Black Pepper, Parmesan, and Rosemary

Savory Oatmeal Cookies with Rosemary, Black Pepper, and Parmesan

Continuing the cheese-and-cracker-in-one theme of this week’s happy hour menus, I baked a batch of savory oatmeal “cookies” with rosemary, black pepper, and Parmesan cheese.  It sounded a little zany when I first read the recipe on The Kitchn, but I was on a tear with the homemade crackers and jumped right in.  (A much later search on the internet turned up all manner of variations on the theme of cookies and crackers combining oats, Parmesan and savory herbs–who knew?)Oatmeal Cracker with Black Pepper, Parmesan, and Rosemary

These are not really cookies and not really crackers.  They’re a little sweet and a lot savory.  Cookers?  Crackies?  No matter.  They wouldn’t be out of place in a cocktail party spread or on a cheese board, but they’d also make a great ending to a meal by themselves alongside a glass of port.  Or, you know, just leave a jar of them on the counter.  They’ll be gone before you know it.

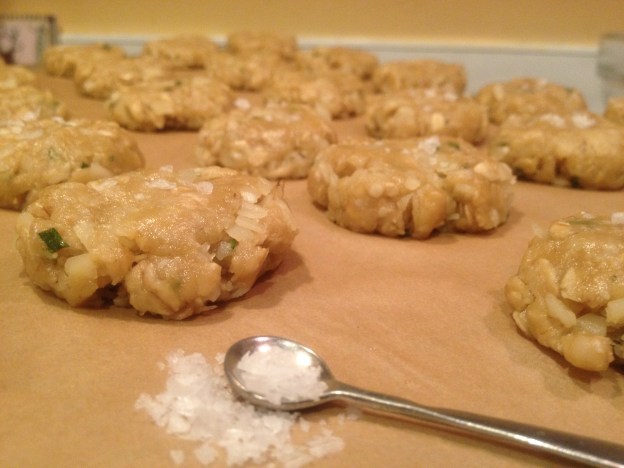
Savory Oatmeal Cookies with Rosemary, Black Pepper, and Parmesan: Sprinkle 1/4 c. hot water over 1 c. rolled oats in a large mixing bowl.  In a smaller bowl, whisk one egg with 1/3 c. olive oil and 1/4 c. light brown sugar.  Pour this mixture over the oats and stir to combine.  In a third bowl (I know, sorry!), mix 1 c. flour with 1/4 tsp. baking soda, 2 tsp. chopped rosemary, 1/2 tsp. salt, and 1/2 tsp. freshly cracked black pepper, then stir in 1 c. freshly grated Parmesan cheese.  Gradually stir the flour mixture into the oat mixture until well combined.  Roll into 1″ balls, flatten each to 1/4″ thick, and place on a parchment-lined cookie sheet.  They can be close together because they don’t grow much.  Sprinkle a pinch of salt (flaky sea salt if you have it) on top of each cookie.  Bake at 350 for 15-18 minutes, until the edges are crisp and golden brown, then move to a rack to cool.

Pictured on the left: Savory Oatmeal Cookies.  On the right: Parmesan and Black Pepper Crackers.  Just add Rye Crackers with Apricot Chevre Spread, a bowl of salty nuts, and the house cocktail.

Earl Grey Chocolate Cake

Shutterbean recently posted this Real Simple recipe for an Earl Grey Chocolate Cake.  And I was torn.  Chocolate and Earl Grey?  Yes.  Dreamy combination.  But Real Simple?  Not for me.  I sometimes want to buy it off a magazine rack, sure, because who wouldn’t want to “Organize Your Whole Life in 15 Minutes” or learn “25 Fast Healthy Breakfast Ideas You’ve Never Thought Of Before”?  But those are false promises, or at most two-page spreads, and when I have actually purchased the magazine I have come away with the feeling that it was really just trying to sell me cleaning products all along.  And I don’t really like to clean.

Luckily, I didn’t let my issues outweigh my love of cake.  Because this is a good one.  I love a chocolatey chocolate cake, which this is not.  (For a moist, delicious, super chocolatey cake, bake these Vegan Chocolate Cupcakes as a cake instead.)  This Earl Grey Chocolate Cake has a lighter chocolate flavor, which is a good thing (weird! I know!), because it allows the tea to come through.  The Earl Grey flavor is subtle, but definitely noticeable.  Intriguing.

The bundt pan that I dug out of the back of my cupboard gave the cake an irresistable chewy-crisp edge.  If you’re a middle-of-the-brownie-pan kind of person instead, don’t worry, all but a few millimeters of the cake is fine-crumbed and moist.  (But oh!  Those few millimeters!  If you are an edge-of-the-brownie-pan kind of person, you will love that edge.)  The bundt pan also made J refer to me (fondly, I think) as a Midwestern housewife.  If you live in the Midwest, do you make a lot of bundt cakes?  I think that is a lifestyle I could definitely embrace.Real Simple Earl Grey Chocolate Cake

I enjoyed making Earl Grey Chocolate Cake in part because you mix everything in one bowl, so it required relatively little cleanup (see above re whether I like to clean).  Boil a cup of water and infuse it for 3-5 minutes with 6 Earl Grey tea bags or 2 Tbsp. loose Earl Grey tea, then set the tea aside.  Spray a bundt or tube pan and set it aside.  Melt and cool 4 oz. semisweet chocolate.*  In your mixing bowl, cream 1/2 c. softened butter with 1 3/4 c. sugar, then mix in 3 eggs. Mix in the melted chocolate.  Continue to mix while adding 2 c. all-purpose flour, 1 tsp. baking soda, 1 tsp. baking powder, 1/4 tsp. salt, 1/2 c. plain yogurt and that strong cup of Earl Grey tea.  Scoop the cake batter into your pan.  Bake 45-50 minutes at 350 or until a skewer comes out with a few crumbs (rather than raw cake batter) attached.  Let the cake cool for 5 minutes, then turn out of the pan.  Cool, then dust with confectioners’ sugar before serving.

*The original recipe called for 4 oz. unsweetened chocolate and 2 c. sugar, but I didn’t have unsweetened chocolate.  Make it easy, use what you have on hand.

Quick Whole Wheat Spice Bread with Brown Sugar, Orange Zest and Walnuts

This afternoon, as my five year old drifted off to napland, she  opened her eyes to dreamily ask, “Mommy, after my nap, can I have TWO MORE PIECES of that bread you made, with butter?”  I smiled and nodded, and she was fast asleep.  Inspiring that kind of delight is the best reward a cook can hope for, in my book.

It’s lucky that this recipe makes two loaves of bread, because my family started  hovering around the cooling rack the moment the bread came out of the oven.  The source of this recipe, Cheryl Sternman Rule (writer of this lovely blog), calls it “Toasting Bread.”  She advises you to cool the bread completely before slicing,  toasting, and spreading it with honey butter.  I am here to tell you that the “letting it cool” part will be very difficult.  We could not withstand the siren scent and ate most of the first loaf warm, slathered in salted butter.  It was heavenly.  Lest it appear that I am contradicting Ms. Rule, however, I should add that the loaf we could bear to let cool was indeed delicious toasted.Quick Whole Wheat Spice Bread with Brown Sugar, Orange Zest and Walnuts: Grease two loaf pans well with softened butter.  Whisk an a egg in large bowl, then whisk in 3 Tbs. honey, 1 c. dark brown sugar and 1 1/2 c. milk.  Zest two oranges directly into the bowl.  Trade your whisk for a wooden spoon or spatula and stir in the dry ingredients: 2 c. whole wheat flour, 2 c. all-purpose flour, 3/4 tsp. ground cloves, 1/2 tsp. salt, and 4 tsp. baking powder.  Mix well, then add 1 c. chopped walnuts and mix again.  Divide batter between your two prepared pans.  Bake at 350 for 45-50 minutes, until a toothpick tester comes out clean.  Remove from pans and cool on a rack.  Hover over the bread, inhaling deeply, resisting as long as you like, then serve toasted (or still warm) with butter.


Vegetarian Enchilada Bake with Black Beans and Tofu

The part of me that enjoys nourishing others is mightily satisfied when I make a casserole.  I know it seems stodgy, but making a heavy pan of food meant to feed a crowd is an act of love.  Maybe that’s why casseroles were so popular in the ’70s–wasn’t love in vogue back then?

We’ll call them love enchiladas, then.  Although there are lots of other good things in here, too: sweet vegetables, a good boost of protein in the black beans, tofu, and cheese, a kick of chile and spice.  But, as usual, there are no hard and fast rules.  Use what you have.

And a love note to vegans or those in a rush: the black bean/tofu/veggie mix also makes a killer taco filling.  Vegetarian Enchilada Bake with Black Beans and Tofu: To make your enchilada filling, saute a diced onion and a diced red pepper over medium-high heat until the onion begins to brown.  Add a diced zucchini, a few cloves of chopped garlic, and some corn.  Add a few pinches of salt, a tsp. dried oregano, and a couple tsp. each of cumin and chile powder.  Stir in a few cups of black beans (with their liquid if you cooked them; drained if they’re canned) and a block of diced tofu.  (If you plan in advance, you can freeze then thaw and crumble the tofu; it gives it a nice texture.)  Add some water if necessary to keep the mixture from sticking, simmer for a few minutes to blend the flavors, then taste for salt and mix in a handful of chopped cilantro at the end.  You want the mixture fairly saucy so your casserole won’t dry out while baking.  Pour a splash of enchilada sauce into a 9×13 pan (I used a prepared one this time, but if you have time it’s always worth making your own from dried chiles).  Layer your ingredients on top of the sauce as follows: corn tortillas to cover the bottom of the pan in a single layer, 1/2 of the veggie mixture, a drizzle of enchilada sauce, a sprinkling of melting cheese, a crumble of feta cheese.  The next layer is corn tortillas, 1/2 the veggie mixture, more corn tortillas, then the rest of your enchilada sauce.  Bake covered at 350 until the enchiladas are hot and bubbling (20-30 minutes if your veggie mixture started out hot), then uncover, sprinkle the top with more of both kinds of cheese, and continue baking until the cheese melts.  You can always turn on the broiler to get the top nice and brown.  Serve with brown rice, a green salad, and lots of good toppings: chopped cilantro, sliced avocado, salsa, sour cream, and some of that amazing cilantro pesto you keep in your freezer.


A Child’s Sugar Cookie

Valentines Day didn’t go exactly as planned this year.  So we put off making our usual heart-shaped cookies until everyone was well enough to be allowed back into the kitchen.  It’s never the wrong day to celebrate with pink heart cookies, I say.

I love this recipe for two reasons.  First, the dough is extremely easy to work with.  Kids can roll it, cut it, move the cookies, re-roll the scraps, and start again.  It isn’t fussy at all.  Second, the recipe came to me from my mom’s good friend, who got it from her “Mumsy” decades ago, and you know those recipes are always the best.  The recipe came labeled: “A Child’s Cookie: stands up to rough handling by kids.”  And indeed it does.

Sugar Cookies: Cream 1/2 c. butter with 1 c. sugar.  Stir in 2 beaten eggs and 1 tsp. vanilla.  Add 2 1/2 c. flour mixed with 2 tsp. baking powder and mix well.  Chill dough in refrigerator for 1 hour or up to several days.  Roll out to 1/8-1/4″ thick, using a little more flour if the dough is sticky (thicker cookies will be softer, thinner will be crisper).  Cut out shapes and bake at 350 on an ungreased cookie sheet.  Baking time will vary according to thickness, but start checking them after 6 minutes and remove from oven before they start to brown.  Cool on a wire rack.  We decorated ours with colored sugar and sprinkles before baking, but of course you can frost these and decorate them once they’re baked.   Or leave them plain–you can never go wrong turning plain thin cookies into Nutella Sandwich Cookies.

Whole Wheat Apple Muffins

Today was baking day.  Bread, cookies, granola, muffins, maybe a cake.  I had the best of intentions.  Butter softening on the counter.  Oats and nuts down from the shelves.  Sugar, honey.  All the ingredients.  And then, as it sometimes does, the day got away from me.  So that was fun too.

But I did make these muffins.  They use 100% whole wheat flour but somehow aren’t heavy.  They’re moist and a little sweet, and you can make them sweeter with a pecan streusel topping.  We always go that route when we have them as a breakfast treat.  Or you can make the muffins plain, as I do when I make them for my kids’ lunchboxes, usually in a mini muffin tin.  Kids dig little things.  And it’s cute to watch the baby enthusiastically eat a whole–if tiny–muffin.

Whole Wheat Apple Muffins require three bowls if you’re making the streusel topping, which I highly recommend.  Make the topping first: mash together or pulse in a food processor 1/2 c brown sugar, 2 tsp. flour, 1/2 tsp. cinnamon, 3 Tb. butter, and 2/3 c. chopped pecans.  Pop the topping into the freezer while you’re preparing the batter (and if you have leftover topping, you can keep it in the freezer for next time).   Mix wet ingredients in one bowl: 2 beaten eggs, 1 1/3 c. buttermilk, 1/3 c. canola oil, 1 1/2 tsp. vanilla.  Mix dry ingredients in a separate bowl: 2 1/2 c. whole wheat pastry flour, 2 tsp. baking powder, 1 tsp. baking soda, 2 tsp. cinnamon, 1/2 tsp. salt, and 1/2 c. (or up to 3/4 c.) brown sugar.  Using a rubber spatula, fold wet and dry ingredients together with 1 c. peeled and finely diced apple.  Don’t stir too much, just until it’s all combined.  Scoop into buttered or lined muffin tins, filling nearly to the top, then pat streusel on top if you are using it.  Bake at 375 in the upper 1/3 of the oven for about 10 mins for mini muffins or 20-25 mins for the larger size.

This recipe is from my all-time favorite cookbook, Deborah Madison’s Vegetarian Cooking for Everyone.  My copy is falling apart, pages are abandoning the binding, it’s oil-stained and thickened by pages that have soaked up sauces, dressings, soup splatters, and my notes in the margins.  What do your favorite cookbooks look like?  And what are they?

Pasta with Garlic, Anchovies, Chili and Breadcrumbs

Sometimes things don’t go according to plan.  I am going to have to update my tagline: “daily recipes…except when I have two sick kids.”  I am also revising my Valentines Day plans for the same reason.  Out with the heart-shaped foods and chocolate desserts.  In with a dinner that takes 25 minutes to make but still says “I love you.”

This recipe is one of J’s favorites.  It comes from one of our favorite Seattle restaurants, Anchovies and Olives, where it is “Bigoli with Garlic, Chili, and Anchovy.”  If you want to make bigoli, more power to you.  If you want a similar-shaped dry pasta, you can use bucatini.  If you want the texture of a fresh pasta, which I do like with the crispy breadcrumbs, you could use any long noodle.  If you just have a box of spaghetti in your cabinet, get it out, it will be great.

Pasta with Garlic, Anchovies, Chili and Breadcrumbs: Put a big pot of water on high heat, and add salt and 1 lb. pasta when it boils.  In a separate small pan, make garlic-infused breadcrumbs by gently heating a couple Tbsp. olive oil with a few smashed cloves of garlic.  Meanwhile, pulse and then grind a few slices of bread to crumbs in your food processor.  Remove the golden cloves of garlic from the oil and enjoy them on chunk of bread while you continue cooking (you have a glass of wine, too, maybe?)–or share them with your Valentine.  Toss the fresh breadcrumbs into the garlic oil and stir occasionally over low heat until they are golden and crisp.  Season with salt and set aside.  Once the breadcrumbs get started in the garlic oil, get another pan (this one big enough to hold the finished dish) on the stove.  Heat 1/4 c. olive oil over medium-low heat with three sliced cloves of garlic, 1 tsp. chili flakes and 12 drained and chopped oil-packed anchovies.  Stir occasionally until the garlic softens and the anchovies melt into the oil.  When your pasta is nearly cooked to your liking, drain and add it to the anchovy sauce pan with 1/4 c. chopped parsley. Toss and continue cooking until pasta is perfectly cooked, tasting and adjusting with more oil or chili flakes if you like.  Serve each bowl topped with a generous spoonful of breadcrumbs.

If you want to gild the lily, you can serve this dish (or your reheated leftovers) topped with a fried egg.

Shaved Brussels Sprout Salad with Lemon, Pecorino and Red Onion

The other day I got to sneak away to one of Seattle’s year-round farmers markets for an hour with a friend.  I hadn’t been to a farmers market for a while and apparently felt that I had to make up for lost time.  I came home with some of my favorite hazelnuts, many pounds of potatoes, rutabagas and turnips, sweet crisp apples, a new supply of Nash’s field peas, and a big bag of Brussels sprouts.  Big.

I’ve had my eye on this salad for a while, and I’m happy to report that it did not disappoint.  The version below is adapted from the Food 52 website, and I’ve updated the recipe title to reflect my own preference for the order in which the flavors should dominate.  As always, one of the joys of cooking at home is that you get to tweak every dish to taste perfect to you.  Go ahead, pile on the cheese or leave the onion out altogether.  You’re the cook.

Any Brussels Sprout Salad is going to start with Brussels sprouts, in this case about 1/2 lb., finely shredded.  (I used the thin slicing blade of my food processor.)  Thinly slice 1/4-1/2 of a small red onion and let it soak in cold water while you make the rest of the salad.  In a small bowl, mix 2 Tbsp. lemon juice, 1 tsp. honey, 1 tsp. whole grain mustard, and a few grinds each of salt and pepper.  Whisk to dissolve honey, then whisk in 1 Tbsp. olive oil and whisk again until the dressing emulsifies.  Pile your Brussles sprouts and drained red onion into a salad bowl, toss with dressing, then add 2 oz. finely grated pecorino cheese and toss again.  Taste and adjust (more lemon?) if that seems like a good idea.

The original recipe says that this salad serves six, but I will get personal here and let you know that J and I polished the whole thing off by ourselves for lunch, alongside a wedge of Smoky Cauliflower Frittata.  I told you we’d be making that again soon. 

Homemade Rye Crackers with Apricot-Chevre Spread

Welcome to Emmy Cooks!  You can see some of my favorite recent recipes by clicking the “My Favorite Recipes” category on the sidebar (here are June, July, and August).  If you like what you see here, you can sign up on the sidebar to receive a daily recipe by email, or follow Emmy Cooks on Facebook, Twitter, or Pinterest.

I buy a lot of foods in bulk from my local co-op.  I think they are cheaper and maybe fresher that way, with much less wasted packaging.  But I never considered a benefit that I was missing out on when I skip the packaging: the recipes on the back of the bag!

Circumstances (read: laziness, since I didn’t want to make an extra grocery stop) recently required me to pick up an already-packaged bag of Bob’s Red Mill Dark Rye Flour.  I like to have rye flour on hand because I use it in my pizza dough and in bread, and someone recently made me delicious Finnish rye cookies that I want to try out soon.  And that’s how I discovered these rye crackers.

This recipe is straight from the back of the Bob’s Red Mill bag.  The crackers are thin and crisp and make a lovely little snack by themselves.  I can imagine serving them alongside a big bowl of cabbage and white bean soup.  But today we ate them in the early evening, topped with a jammy smear of apricot-chevre spread, with a glass of sparkling wine and some good friends.  I thought the combination was rather nice, myself.

To make Rye Crackers: In a medium bowl, mix 1/2 c. all-purpose flour, 1/2 c. rye flour, 1/2 tsp. salt, 1 Tbsp. Turbinado sugar, 1 tsp. baking powder and 2 tsp. caraway seeds.  Add 4 Tbsp. butter and work into the dough until crumbly (I recommend using your hands to pinch and rub the butter into the dry ingredients).  Stir in 3 Tbsp. milk.  Form dough into two balls and roll each out to 1/8-1/16 inch thickness between two sheets of waxed paper.  Cut into desired shapes and prick with a fork.  Bake at 400 degrees on ungreased cookie sheets for 5-8 mins (depending on how thin you rolled them) until edges begin to brown.  Cool on rack and, in the unlikely event that you have leftovers,  store them in an airtight container.

We enjoyed these crackers with an apricot-chevre spread, which was simply a few good spoonfuls of homemade apricot jam stirred into a few oz. of soft goat cheese.  I’m sure they’d also be good with a sharp cheddar, soft havarti, or blue cheese.

Say What You Mean With Homemade Conversation Hearts

I have to start with a few confessions here.  One: This may be the farthest thing from “real food” that will ever grace these pages.  Two: Making homemade conversation hearts is about ten times more cutesy than I am in real life.  Three: Even though I’m trying to play it cool, I secretly had so much fun making these with my three year old.

There are, I suppose, a few good reasons to make your own Valentines Day conversation hearts, especially if you happen to have time to kill and an enormous quantity of powdered sugar on your hands.  The boxed kind have no fewer than five unrecognizable ingredients.  They taste awful.  And they say things like “text me” these days.  Wouldn’t you rather personalize yours with a message like “Marry Me” or “I think we should just be friends”?Conversation Heart Cutouts emmycooks.comEasy peasy.  Enter homemade conversation hearts.  I have quite a fondness for the CakeSpy cookbook Sweet Treats for a Sugar-Filled Life, which inspired this wacky project.  And it was easier than I thought it would be.

Please note that if you are going to get crazy and make these, you should start ASAP.  The hearts need to dry for 24 hours before you can write on them.

DIY Conversation Hearts start with a small bowl, in which you combine 1/2 c. water, 2 tsp. light corn syrup, and 1/4 oz. powdered gelatin.  Whisk well, microwave for 30 seconds, then whisk well again.  Dump mixture into the bowl of your mixer with 1 c. powdered sugar (in case you’re shopping, I used almost 2 1/2 lbs. powdered sugar in all).  Turn mixer on low and slowly incorporate 2 lbs. powdered sugar, scraping the bowl down occasionally.  Turn your sticky dough out onto a surface heavily dusted with MORE powdered sugar and knead like bread dough, adding more powdered sugar as you go, until the dough is satiny rather than sticky.

Divide the dough into as many colors as you want, and knead a few drops each of food coloring and flavoring (I used almond extract) into each ball.  This step is messy; I lined my counter with parchment paper to avoid staining.  I also added more powdered sugar as I worked in the liquid color and flavor.

Roll the dough out 1/8-1/4 inch thick.  Use heart -shaped cutters (I used a set of fondant cutters) to make tiny or almost-tiny hearts.  (Smaller = more realistic. Bigger = easier to write on.)  Pinch the scraps back together and re-roll.  The original recipe said it would make 100 hearts, but it actually made a gazillion.  Really.  More than 500.

Let the hearts dry on parchment paper for 24 hours, then use food coloring markers (like Gourmet Writer Food Pens) to ink the hearts with Valentines messages that express your own true self.  If that means writing “text me,” so be it–at least the recipient will know that you really mean it.

Conversation Heart Scraps emmycooks.com