Tag Archives: vegan

White Bean and Spinach Soup

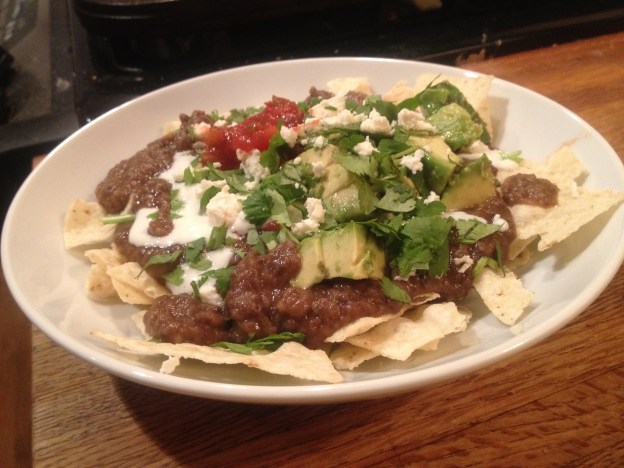
I’d say that in the past few months, I’ve been quite successful in my quest to stop feeding my family scrambled eggs for dinner all the time.  But I’m still not much of a planner.  Which means that the dinner hour is often neigh by the time I roll into the kitchen, wondering how our evening meal is going to materialize.

At times like these, it helps to have a well-stocked pantry.  And freezer.  This is one of those recipes that you can spend all afternoon making–or it can take 30 minutes if you keep the right ingredients in stock.  In this case, the right ingredients are an onion, a leafy green vegetable, a good vegetable broth, and some well-seasoned home-cooked white beans.  (Of course you can substitute canned beans, but you must first brown an onion, then toss in a handful of chopped garlic and sage for a few minutes, then add the beans and cover with water or vegetable broth and simmer to let the flavors blend.)
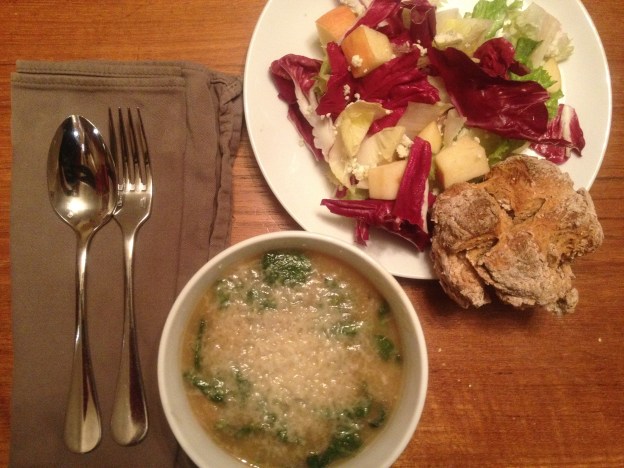
Do you cook your own beansMake your own broth?  I do, because I find the homemade versions of these things so much better and SO much cheaper than anything I can buy.  This might seem inconsistent with my professed inability to plan ahead, but I just do it every once in a while when I will be home on a Sunday afternoon: put a huge pot of beans on the stove or make eight quarts of stock.  It helps that I have a large freezer to store these things in.  What do you people do in Manhattan?  Anyway, I will start sharing recipes for some of the pantry basics that make it easier for me to get a good meal on the table quickly.  Another day.Today, White Bean and Spinach Soup: Grab a quart of good vegetable broth and a few cups of well-seasoned white beans from your freezer.  Warm the beans in a soup pot with a cup or so of broth while you saute an onion over high heat in a separate pan.  Once the onion is nearly golden and nearly caramelized, use a slotted spoon to scoop about half your beans into a blender and puree them with the onion and another cup of broth.  Add the puree to your soup pot and stir in a big bunch of chopped spinach (chard, kale, or other greens would also be great).  Simmer until the greens are tender, then thin the soup to your desired consistency with additional broth and season to taste with salt and pepper.  Serve under a shower of Parmesan shavings or a drizzle of olive oil, with crusty rolls on the side.  (The one pictured is a mini whole wheat soda bread, recipe to come after a little more experimentation.)  And what’s that gorgeous salad, you ask?  Radicchio? Endive? Apples? Blue cheese?  Oh, yes.  Hop on over to the lovely blog Salt On the Table for the full recipe.

Vegetarian Enchilada Bake with Black Beans and Tofu

The part of me that enjoys nourishing others is mightily satisfied when I make a casserole.  I know it seems stodgy, but making a heavy pan of food meant to feed a crowd is an act of love.  Maybe that’s why casseroles were so popular in the ’70s–wasn’t love in vogue back then?

We’ll call them love enchiladas, then.  Although there are lots of other good things in here, too: sweet vegetables, a good boost of protein in the black beans, tofu, and cheese, a kick of chile and spice.  But, as usual, there are no hard and fast rules.  Use what you have.

And a love note to vegans or those in a rush: the black bean/tofu/veggie mix also makes a killer taco filling.  Vegetarian Enchilada Bake with Black Beans and Tofu: To make your enchilada filling, saute a diced onion and a diced red pepper over medium-high heat until the onion begins to brown.  Add a diced zucchini, a few cloves of chopped garlic, and some corn.  Add a few pinches of salt, a tsp. dried oregano, and a couple tsp. each of cumin and chile powder.  Stir in a few cups of black beans (with their liquid if you cooked them; drained if they’re canned) and a block of diced tofu.  (If you plan in advance, you can freeze then thaw and crumble the tofu; it gives it a nice texture.)  Add some water if necessary to keep the mixture from sticking, simmer for a few minutes to blend the flavors, then taste for salt and mix in a handful of chopped cilantro at the end.  You want the mixture fairly saucy so your casserole won’t dry out while baking.  Pour a splash of enchilada sauce into a 9×13 pan (I used a prepared one this time, but if you have time it’s always worth making your own from dried chiles).  Layer your ingredients on top of the sauce as follows: corn tortillas to cover the bottom of the pan in a single layer, 1/2 of the veggie mixture, a drizzle of enchilada sauce, a sprinkling of melting cheese, a crumble of feta cheese.  The next layer is corn tortillas, 1/2 the veggie mixture, more corn tortillas, then the rest of your enchilada sauce.  Bake covered at 350 until the enchiladas are hot and bubbling (20-30 minutes if your veggie mixture started out hot), then uncover, sprinkle the top with more of both kinds of cheese, and continue baking until the cheese melts.  You can always turn on the broiler to get the top nice and brown.  Serve with brown rice, a green salad, and lots of good toppings: chopped cilantro, sliced avocado, salsa, sour cream, and some of that amazing cilantro pesto you keep in your freezer.


Roasted Maple Squash Soup

Some days you need something delicious in a hurry. Preferably something warm, if it’s February and you live in Seattle. Preferably soup.  In fact, hopefully you have some of this soup stashed in your freezer.  If you don’t now, you will soon.

This is the kind of soup that can turn you from a recipes-only cook into a confidently-winging-it cook.  It’s kind of foolproof that way.

Roasted Maple Squash Soup: Roast a winter squash.  Any winter squash.  Roast a few, while you’re at it.  Cut each in half, rub the cut sides with oil, bake face down on a rimmed sheet at 400 degrees until soft.  (Scoop out the seeds and save them in your freezer to make vegetable broth.)  Scoop the roasted flesh into a soup pot.  (Put the peel in the freezer with your seeds.  Mmm, homemade veggie broth.  That will be another post.)  Cover your squash with broth, maybe one that you’ve made yourself.  (Come to think of it, you could make a quick broth now with those seeds and peels: cover with water and add 3/4 tsp. salt per quart of water and maybe a chopped onion or some herbs, simmer 30 minutes and strain.)  So: roasted squash, broth, salt and maple syrup to taste.  Simmer, mash or puree the squash, adjust the seasonings.  Maybe that’s it.  Maybe you’re feeling indulgent?  Try a splash of cream or coconut milk.  Make sure you make some extra soup for the freezer.

Roasted Cauliflower

Yesterday got me thinking about flavorful vegetarian cooking.  I have been a vegetarian (or, now, a mostly-vegetarian, with apologies to those who are offended by the concept) for my entire cooking life.  So I have never relied on meat to flavor my food.  What do I rely on?  Vegetables, heat applied to vegetables, fat, salt, spices and herbs.  I also know and revel in the range of textures and flavors that each vegetable can provide on the plate: a beet can be meltingly sweet and earthy or brightly crisp and bracingly imbued with lemon or ginger.  Fennel can be a licorice tangle of crunch, a whisper of greens in a salad, or carmelized to a sweet and savory mush that is barely haunted by anise flavor.  And I get excited every time I discover a novel way to cook a vegetable.

By way of illustrating the range of a humble vegetable, I thought I’d share a very simple but utterly delicious recipe for roasted cauliflower.  Compare it to this simple, creamy 5-ingredient Cauliflower Soup (cauliflower, onion, olive oil, water, salt).  Compare it to this Smoky Cauliflower Frittata.  You can take a cauliflower in a lot of directions.  But once it’s roasted, that’s pretty much the end of the line for a cauliflower in our house.  It often gets eaten off the sheet pan before dinner is even on the table.

Roasted Cauliflower: Chop one head of cauliflower (or two, if you want one left to put on the table with dinner) into medium florets, and chop the remaining stem into slightly smaller pieces.  If the leaves are large, chop them as well, otherwise leave them whole.  Pile onto a roasting pan, including the tiny bits–these will brown into delicious little salty bites.  Toss with olive oil and salt and roast at 450.  Turn with a tongs after 20 minutes, then every 10 minutes after that, until they are nice and brown on all sides (about 45 minutes total).  Hide from passers-by until serving.


Say What You Mean With Homemade Conversation Hearts

I have to start with a few confessions here.  One: This may be the farthest thing from “real food” that will ever grace these pages.  Two: Making homemade conversation hearts is about ten times more cutesy than I am in real life.  Three: Even though I’m trying to play it cool, I secretly had so much fun making these with my three year old.

There are, I suppose, a few good reasons to make your own Valentines Day conversation hearts, especially if you happen to have time to kill and an enormous quantity of powdered sugar on your hands.  The boxed kind have no fewer than five unrecognizable ingredients.  They taste awful.  And they say things like “text me” these days.  Wouldn’t you rather personalize yours with a message like “Marry Me” or “I think we should just be friends”?Conversation Heart Cutouts emmycooks.comEasy peasy.  Enter homemade conversation hearts.  I have quite a fondness for the CakeSpy cookbook Sweet Treats for a Sugar-Filled Life, which inspired this wacky project.  And it was easier than I thought it would be.

Please note that if you are going to get crazy and make these, you should start ASAP.  The hearts need to dry for 24 hours before you can write on them.

DIY Conversation Hearts start with a small bowl, in which you combine 1/2 c. water, 2 tsp. light corn syrup, and 1/4 oz. powdered gelatin.  Whisk well, microwave for 30 seconds, then whisk well again.  Dump mixture into the bowl of your mixer with 1 c. powdered sugar (in case you’re shopping, I used almost 2 1/2 lbs. powdered sugar in all).  Turn mixer on low and slowly incorporate 2 lbs. powdered sugar, scraping the bowl down occasionally.  Turn your sticky dough out onto a surface heavily dusted with MORE powdered sugar and knead like bread dough, adding more powdered sugar as you go, until the dough is satiny rather than sticky.

Divide the dough into as many colors as you want, and knead a few drops each of food coloring and flavoring (I used almond extract) into each ball.  This step is messy; I lined my counter with parchment paper to avoid staining.  I also added more powdered sugar as I worked in the liquid color and flavor.

Roll the dough out 1/8-1/4 inch thick.  Use heart -shaped cutters (I used a set of fondant cutters) to make tiny or almost-tiny hearts.  (Smaller = more realistic. Bigger = easier to write on.)  Pinch the scraps back together and re-roll.  The original recipe said it would make 100 hearts, but it actually made a gazillion.  Really.  More than 500.

Let the hearts dry on parchment paper for 24 hours, then use food coloring markers (like Gourmet Writer Food Pens) to ink the hearts with Valentines messages that express your own true self.  If that means writing “text me,” so be it–at least the recipient will know that you really mean it.

Conversation Heart Scraps emmycooks.com

Roasted Tomatoes, or, How to Coax Summer Flavor from Winter Tomatoes

Winter tomatoes, blah, we all know that.  At least in these latitudes.  When I visited California in December, my mom had a 10-foot Roma tomato plant that had climbed beyond its trellis into the apple tree and was still fruiting as it reached for the winter sky.  Here in Seattle, I can barely get a tomato to ripen in my back yard in September.  But that’s a different story.

This is not, mind you, a recipe for turning a winter tomato into a summer tomato.  There is nothing you can do in mid-February to turn a hard, lifeless winter tomato into the juicy, fragrant, wonderous thing that a summer tomato is.  This is a recipe for something different altogether.  Something jammy and sweetish, but with the acid undertones of tomato flavor.  Something with a little chew and a little luscious pulp and juice.  Something you will want to eat a lot of.

In the summertime, I like to buy tomatoes by the box to roast and freeze for winter.  We use them all year on pizzas, in soups and pastas and sandwiches, in pots of white beans.  They’re great with roasted garlic, or smeared onto a piece of toast with fresh goat cheese.  But eventually we run out.  These roasted tomatoes can be used in all the same ways.

Roasted Tomatoes take some time, so start early or make a batch on the weekend to use throughout the week.  Quarter Roma tomatoes and place them on a baking sheet with a handful of thyme sprigs.  Drizzle with olive oil and a little balsamic vinegar, which will sweeten as it reduces, and sprinkle lightly with salt.  Bake at 275 for a long, long time.  Maybe two hours.  You want the edges to begin to brown and the bodies to collapse into a succulent, semi-dried state.  Taste one.  If it is watery, or if it still says winter tomato to you, leave it in a bit longer.

These tomatoes would be darn tasty, come to think of it, on yesterday’s homemade spinach pasta.  We’ll have to make that again soon.


Got Tortilla Chips? Make Chilaquiles!

I understand that Super Bowl Sunday is a day devoted to snacking excess.  But when it’s all over, and you’re looking to recover with a healthy meal this week, try this recipe.  (Or make it right away without the cheese to knock the socks off the vegans at your Super Bowl party–in which case you should call it “Vegan Nachos.”)

I don’t think that this bowl of spicy, smoky, chipotle-spiked deliciousness technically qualifies as chilaquiles, but that’s what we call it.  And it’s what Jack Bishop calls it in A Year in A Vegetarian Kitchen.  Based on my exhaustive research (read: eating my way through Oaxaca a few years ago), this dish may really be closer to enfrijoladas.  But whatever.  I’m no purist.  You can do some research on Wikipedia and make your own decision.

A few notes on the ingredients.  A more authentic recipe would have you quarter corn tortillas and fry them (or, more realistically around here, bake them in the oven) until crisp.  But THIS recipe uses tortilla chips.  It’s a time-saving shortcut, and you are going to have all those leftover bags of chips after your Super Bowl party.  But if you prefer to start with corn tortillas, more power to you, just brush both sides with oil, sprinkle with salt, cut them into 1/2″ by 2″ strips and bake them at 350 until they start to crisp (maybe 10-13 minutes), then set them aside to cool while you do the rest.  And about the chipotle puree: buy a can of chipotle chiles in adobo sauce, scrape the entire contents into your blender, and whizz to a puree.  Keep it in a jar in your fridge.  Use it on everything.  Now back to the chilaquiles.

The backbone of this Chilaquiles recipe is your pot of beans.  Chop a big onion and brown it in a pot over medium-high heat.  When the onion gets a few shades past golden brown, mix in 5 minced garlic cloves and 1-2 tsp. chipotle puree. Notice that your kitchen is starting to smell great.  Add 4 cups cooked or canned black beans (if you cooked the beans yourself, add the liquid.  If they’re canned, drain and rinse them).  Add enough additional water to nearly cover the beans.  Add 1/2 to 1 1/2 tsp. salt (depending on whether the the beans are already salted) and simmer for about 20 mins to blend the flavors.  Puree with an immersion blender and add more salt to taste.  Serve with tortilla chips and assorted toppings: salsas, mexican crema (or sour cream thinned with milk), diced avocado, lime wedges, queso fresco or feta cheese and chopped cilantro.  The photo above also shows a bowl of pickled onions and hot peppers I had left over from making fish tacos.  Everyone grabs a bowl, adds a handful of chips and a ladle of beans, then toppings to taste.  Buen provecho!

Simple Brown Rice Sushi Bowl

There is an extensive list of finicky cooking tasks that J & I don’t do anymore.  Making sushi for a crowd is on that list.  Love the flavors, hate the time it takes to assemble and slice 20 rolls.  This is an easy way out, and can easily be scaled to feed many or a few.

To make this Simple Brown Rice Sushi Bowl spread, start by making a pot of cheaters’ sushi rice.  Bring to a boil one part short-grain brown rice in two parts water with 1/2 tsp. salt per cup of rice, then lower the pot to a simmer for 40 minutes.  Remove from heat and leave covered for 5 minutes (I put a clean dishtowel under the lid to absorb some moisture), then fluff with a fork and stir in seasoned rice vinegar and additional salt to taste.  Set rice aside.  Meanwhile, prepare your toppings: roast a pan of sweet potato batons (for about 30 minutes at 450, stirring a few times), pan-fry some tofu (I season mine with equal parts soy sauce and fish sauce plus a pinch of sugar), and slice up some green onions, nori strips, and avocado.  Other possible toppings could include edamame, mushrooms or spinach sauteed in sesame oil, a thinly-sliced egg pancake, raw fish–whatever floats your sushi boat.  Serve rice and toppings separately and let everyone assemble their own bowls.  Garnish with toasted sesame seeds.

Creamy Pear Vinaigrette

At this time of year, there are often two things happening in my kitchen.  First, I am eating a lot of salads made from crunchy winter vegetables, because, well–even here in temperate Seattle–I know that tender lettuce is out of season in the dead of winter.  And I am starting to crave a salad that speaks of springtime, full of lettuce’s delicate crunch.  The second thing that is often happening in my kitchen right about now is that a pear is lingering in the fruit bowl that is five minutes too ripe to be considered absolutely perfect.  When these two events coincide–which, as I said, they often do at this time of year–I take it as an omen and make this salad dressing.

This Pear Vinaigrette is creamy, sweet, and lower in fat than more traditional vinaigrette dressings.  Tonight I just tossed it with lettuce for a very simple green salad, but you can also use it to doll up a fancier salad by including nuts, fresh or dried fruits, cheeses, you name it.  In your blender, just whizz a chopped super-ripe pear, 1/3 c. olive oil, 2 Tbsp. apple cider vinegar, 2 Tbsp. apple juice (or water), 1 tsp. dijon, 1 tsp. fresh thyme leaves, a few grinds of pepper and 1/4 tsp. salt.  A very-ripe pear makes this dressing plenty sweet for me, but you can also sweeten it to taste with maple syrup.  (I haven’t tried this, but the gorgeous vegan blog v:gourmet recommends it.  Although I only met her–I mean her website–moments ago, I trust the writer implicitly because we have almost the exact same favorite cookbooks.)

Speaking of cookbooks, this recipe is from Moosewood Restaurant’s Cooking for Health.  Of the many recipes I tried in that book when I first got it, I think this is the only one that stuck in my regular rotation.  It probably says a lot about my expansive cookbook collection when I keep a cookbook for just one recipe.  Although now that I’ve jotted the recipe down here, maybe I will move it along to make room for a new cookbook.

If you were making room on your shelf for just one great new recipe collection, which would it be?

Winter Vegetarian Chili

The chili purists bicker about beans, no beans, veggies, no veggies, whatever.  This recipe is not for them.  They’d flip out over this one. It’s smoky, meaty, tomato-y, all the things a good chili should be–but it’s vegetarian.

This is a secret, shh, but this chili has wheat berries* in it.  I know, it’s crazy.  But they’re great.  They are combined with black beans to give the chili texture and rib-sticking density, while the flavor is anchored by chipotles and cumin and elevated by lime and cilantro at the end.  This is my go-to winter chili.

To make this Winter Vegetarian Chili, start by cooking about a cup of wheat berries in water to cover by an inch and a teaspoon of salt.  (Cooked wheat berries freeze well, though, so why not make more while you’re at it?)  Bring them to a boil and simmer for about an hour, until pleasantly chewy.  Meanwhile, get your chili going: saute a chopped onion with a chopped red pepper for a few minutes, then add 5 minced cloves of garlic, 1 tsp. oregano and 2 tsp. each of chili powder and cumin.  Once the spices start to get toasty, stir in 1-2 tsp. of pureed chipotles until fragrant (I buy canned chipotles in adobo and puree the whole can with the adobo sauce; the puree keeps in the fridge forever, as far as I can tell).  Then add a big can of chopped tomatoes, 3-4 c. of cooked or canned black beans (with some of their liquid, if you cooked them yourself), some of the liquid from the cooked wheat berries, a Tbsp. of brown sugar and salt and pepper to taste.  Simmer for a while and then add your drained cooked wheat berries and cook for a few minutes longer.  Squeeze in a whole lime at the end.  I first found this recipe in Eating Well, which basically means it’s health food.  But don’t let that stop you from topping your bowl with some grated cheese and sour cream in addition to avocado, a lime wedge and cilantro.  And you can never go wrong with a chunk of corn bread.

*What’s a wheat berry, you ask?  It’s the whole wheat kernel, it looks a little like brown rice, and it cooks up into a nutty, chewy, delicious little bite of good-for-you-whole-grain.  Wheat berries make great salads, I’ll tell you about that another time.  And when you’re shopping for them, pick hard red wheat berries instead of soft white ones–but if white wheat berries are all you have, don’t worry, they’ll work just fine.