Tag Archives: lifestyle

Eat Your Greens: Easy Handmade Spinach Pasta

Sometimes, as a threat, I tell my children that there were times, like maybe in the 1950s, when children weren’t even allowed INTO the kitchen.  They had to PLAY OUTSIDE until dinner was ready.  They did not ever get to help cook, and they CERTAINLY were not allowed to gambol about the cook’s feet or play frisbee with the tupperware lids to entertain the baby.  My children stare at me, slack-jawed and wide-eyed.  Being banned from the kitchen is as bad a fate as they can imagine.

In fact, many evenings when I head into the kitchen to start thinking about dinner, they beat me there, pulling their stepladders up to the counter.  “How can we help?”  They measure as we bake, pile cut veggies onto the tray to roast, push the buttons on the machines.  They find the pots, help set the table, and enthusiastically stir clouds of flour and glops of sauces right onto the floor.

So when my little chefs make a dinner request, I like to indulge them.  The other night my five year old requested stracci di pasta.  Actually, what she said, with a bordering-on-maniacal gleam in her eye, was “Mama, can we make that pasta where we get to cut it up by ourselves WITH A SHARP KNIFE?”  (Sharp knives–even not VERY sharp knives–are exciting to the preschool set.)  Indeed we could.

Homemade egg pasta is actually very easy if you have a pasta roller.  If you don’t, forget it, borrow a friend’s and then come back for the recipe.  We made ours with spinach both for the emerald color and because I want my kids to cook with and eat vegetables on purpose (as opposed to only hidden-in-their foods veggies, which seems to be a trend).  This recipe, like many of my favorites, started its life in Deborah Madison’s Vegetarian Cooking for Everyone.

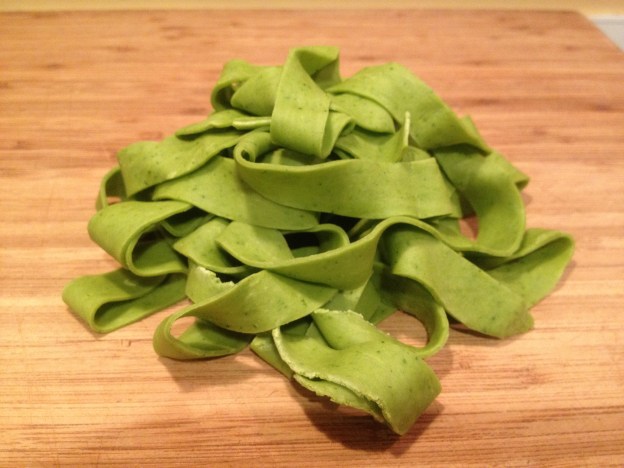
Fresh Spinach Pasta starts with two c. lightly packed spinach leaves blended with two eggs until liquid.  Mix 2 c. flour with 1/4 tsp. salt in a mixer/food processor/bowl then add the liquid while stirring or mixing on low speed.  The dough will be quite crumbly but if it is unworkably dry or sticky you can adjust with a spoonful of water or flour.  Turn out onto a cutting board and knead until smooth.  Cover and let rest 15 minutes.  Cut dough into 4-6 pieces and flatten each into a rough rectangle.  Set your pasta roller to the widest setting and roll the dough through, then fold in half or thirds and roll again to continue kneading the dough.  Do this a few times, then stop folding and start thinning out the dough by running it through the machine on progressively thinner settings.  When your pasta is suitably thin, repeat with remaining dough.  Let your kids cut the pasta into stracci (“little rags”), or fold it as shown and slice into noodles.  (If the pasta seems at all sticky, flour it lightly for this step.)  Pull apart into a pile of noodles and toss with a few pinches of flour to keep the noodles from sticking.  Cook in a boiling pot of salted water for a few minutes, tasting as you go (cooking time will depend on the thickness of your pasta).

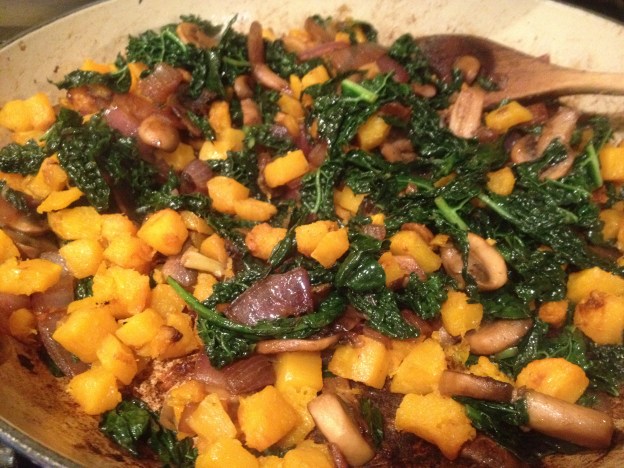
We drained our pasta and tossed it into a pan of puttanesca-style sauce: olive oil, garlic, capers, tomatoes, red pepper flakes, dried oregano, and a few more handfuls of spinach.

DIY Baby Food: Make Real Food for Someone You Love

If you don’t have a baby of your own, don’t go anywhere.  This applies to you too. Because who doesn’t love to eat baby food sometimes?  I’m KIDDING.  But if you know someone with a baby, and want to do something nice for them, you could ask if they would like the gift of homemade baby food.  Parents are always busy and anyone who offers to lend a hand is doing a public service.  It takes a village, people.

I have always been confused about why people who care what they feed themselves buy jarred food for their babies.   Even if the label says organic happy super-healthy baby food, I can’t help but imagine that the fruits and vegetables that go into the puree are not the gorgeous specimens that would otherwise be gleaming in the produce aisle.  But maybe I’m just suspicious like that.  Plus, buying baby food is expensive and making it is cheap and easy.

Here’s the big recipe for DIY Baby Food: peel and steam or roast an organic fruit or vegetable.  Puree or mash it (older babies can eat chunkier foods).  Freeze solid in ice cube trays, then pop them out into a freezer bag for storage.

Some easy classics: carrots, peas, apples, pears, winter squash, peaches.  Find something that’s seasonal and delicious.  Babies learn to love real food through these early experiences.

Today my own baby enjoyed sharing bites of tofu and egg out of my spicy bowl of pad thai, so I am thinking the days of smushed-up baby food are close to over around here.  But if I can help out a friend, you can bet I’ll be making it again soon.

Smoky Cauliflower Frittata

I love my garden and I love my CSA, both of which I treasure for the fresh, delicious, seasonal food they bring into my kitchen.  But I have to admit to a guilty pleasure: the off season.  When I get to select each and every vegetable myself just because I feel like eating it this week.  When I don’t have a bumper crop of arugula or zucchini demanding that I make pesto or relish.  When I don’t have to resist buying some enticing vegetable because my CSA box is groaning under the weight of other harvest bounty.  (I know, some people have real problems, right?)

So anyway, this week, I just up and bought two heads of cauliflower.  I did!  And after you make this frittata for the first time with the reasonable single head of cauliflower you will no doubt purchase at first, I am pretty sure that you will hurry back to the store for two more heads of cauliflower as well.  Just in case you have to make the frittata twice more in rapid succession.  Which might be my plan.

The smokiness here comes from a combination of smoked cheese and smoked paprika, another could-be-overkill-but-isn’t epiphany from the Ottolenghi cookbook Plenty.  I wouldn’t normally say that smoked cheese is my thing, but this frittata is something.  Something good.  J says it tastes meaty.  He means that as a compliment.

This Smoky Cauliflower Frittata would be excellent at any meal, and it is flavorful enough that you could cube it up to serve as a bite-sized party snack (or, you know, a straight-from-the-fridge snack).  In salted water, parboil a small cauliflower, including the stem, cut into medium pieces.  Drain well, then saute in an ovenproof pan with 2 Tbsp. olive oil until the edges of the florets begin to turn golden brown.  Meanwhile, heat oven to 375 and grate and toss together 5 oz. smoked cheese (I used Beechers) and 2 oz. aged cheddar.  In a large bowl, thoroughly combine 6 eggs, 1/4 c. greek yogurt (the original recipe called for creme fraiche), 2 Tbsp. dijon and 2 tsp. sweet smoked paprika, then stir in 3 Tbsp. finely chopped chives and 3/4 of the grated cheese (reserve the remaining cheese for later).  Season well with salt and pepper.  When the cauliflower florets look nice and toasty, pour the egg mixture over the cauliflower and use a fork to distribute the cauliflower and cheese evenly around the pan. Cook about 5 minutes over medium heat.  Scatter remaining cheese on top, move to oven, and cook 10-12 minutes more until the frittata is nearly set.  I like to finish by turning the oven up to a broil for a couple of minutes at the end (leaving the pan on the middle rack) to slightly brown the top.  Let rest a few moments, then serve hot.  (Most frittatas are also great cold or at room temperature, but I preferred this one hot.)  I served it with a plain green salad dressed with this lemony vinaigrette.

A Healthy Indulgence: Whole Grain Banana Cardamom Muffins (with optional chocolate, of course)

I’ve been keeping a close eye on the banana situation recently.  We like bananas in our family, I usually keep the fruit bowl stocked with them, but, you know, sometimes there is disequalibrium between supply and demand.  And for those times there is banana bread.

After the first brown spots appeared on the bananas on my counter, I began to get hopeful.  I flipped through a few of my cookbooks, contemplating my banana bread options.  I saw a recipe for a banana cardamom cake and got excited.  Days went by.  The bananas were definitely going to be mine to bake with.  Really, it was time.  Seriously.

Then today this recipe popped up on my screen, and I was ready.  (Isn’t that a nice blog?  Go ahead, go click through to her website, check out that recipe, and vote for her for a Bloggie for Best Canadian Blog.  I’ll wait.)  You back?  So you saw why I didn’t just make that recipe: the coconut.  I know I’m in the minority here, but coconut isn’t my favorite.  What IS my favorite, you ask?  Chocolate, of course.  So I knew it was time for a recipe mashup.  One other consideration was that I wanted to make these healthy enough for my kids’ school lunches, which meant that starting with a stick of butter was out.

I went halfsies on this recipe and made some some of the muffins with cocoa and chocolate chips and the rest without.  You’ll like them either way.  Banana Cardamom Muffins start with 2-3 mashed bananas, of course, preferably sorry browning specimens that have been rejected by your family.  Mix the mashed bananas with 3/4 c. buttermilk, 1/2 c. brown sugar, an egg, and 2 Tb. melted butter.  Stir 1 c. oats into the wet ingredients.  In a separate bowl, combine 1 1/4 c. whole wheat pastry flour, 1 tsp. ground cardamom, and 1 1/2 tsp. baking soda.  (If you are making the chocolate version, now add 2 Tbsp. cocoa powder and a handful of chocolate chips to the dry ingredients and 1 tsp. vanilla to the wet ingredients.)  Mix the wet ingredients into the dry just to combine and scoop the batter into lined muffin tins.  Bake at 350 for 20-23 minutes, checking every minute after 20 minutes to avoid overbaking.

Got Tortilla Chips? Make Chilaquiles!

I understand that Super Bowl Sunday is a day devoted to snacking excess.  But when it’s all over, and you’re looking to recover with a healthy meal this week, try this recipe.  (Or make it right away without the cheese to knock the socks off the vegans at your Super Bowl party–in which case you should call it “Vegan Nachos.”)

I don’t think that this bowl of spicy, smoky, chipotle-spiked deliciousness technically qualifies as chilaquiles, but that’s what we call it.  And it’s what Jack Bishop calls it in A Year in A Vegetarian Kitchen.  Based on my exhaustive research (read: eating my way through Oaxaca a few years ago), this dish may really be closer to enfrijoladas.  But whatever.  I’m no purist.  You can do some research on Wikipedia and make your own decision.

A few notes on the ingredients.  A more authentic recipe would have you quarter corn tortillas and fry them (or, more realistically around here, bake them in the oven) until crisp.  But THIS recipe uses tortilla chips.  It’s a time-saving shortcut, and you are going to have all those leftover bags of chips after your Super Bowl party.  But if you prefer to start with corn tortillas, more power to you, just brush both sides with oil, sprinkle with salt, cut them into 1/2″ by 2″ strips and bake them at 350 until they start to crisp (maybe 10-13 minutes), then set them aside to cool while you do the rest.  And about the chipotle puree: buy a can of chipotle chiles in adobo sauce, scrape the entire contents into your blender, and whizz to a puree.  Keep it in a jar in your fridge.  Use it on everything.  Now back to the chilaquiles.

The backbone of this Chilaquiles recipe is your pot of beans.  Chop a big onion and brown it in a pot over medium-high heat.  When the onion gets a few shades past golden brown, mix in 5 minced garlic cloves and 1-2 tsp. chipotle puree. Notice that your kitchen is starting to smell great.  Add 4 cups cooked or canned black beans (if you cooked the beans yourself, add the liquid.  If they’re canned, drain and rinse them).  Add enough additional water to nearly cover the beans.  Add 1/2 to 1 1/2 tsp. salt (depending on whether the the beans are already salted) and simmer for about 20 mins to blend the flavors.  Puree with an immersion blender and add more salt to taste.  Serve with tortilla chips and assorted toppings: salsas, mexican crema (or sour cream thinned with milk), diced avocado, lime wedges, queso fresco or feta cheese and chopped cilantro.  The photo above also shows a bowl of pickled onions and hot peppers I had left over from making fish tacos.  Everyone grabs a bowl, adds a handful of chips and a ladle of beans, then toppings to taste.  Buen provecho!

Put a Fried Egg on Your Pasta

Ok, so I’ll give you that this is more of a tip than a recipe.  But I promise you this: a salty, garlicky, spicy plate of pasta is even better with a fried egg on top.

Image

Simple Brown Rice Sushi Bowl

There is an extensive list of finicky cooking tasks that J & I don’t do anymore.  Making sushi for a crowd is on that list.  Love the flavors, hate the time it takes to assemble and slice 20 rolls.  This is an easy way out, and can easily be scaled to feed many or a few.

To make this Simple Brown Rice Sushi Bowl spread, start by making a pot of cheaters’ sushi rice.  Bring to a boil one part short-grain brown rice in two parts water with 1/2 tsp. salt per cup of rice, then lower the pot to a simmer for 40 minutes.  Remove from heat and leave covered for 5 minutes (I put a clean dishtowel under the lid to absorb some moisture), then fluff with a fork and stir in seasoned rice vinegar and additional salt to taste.  Set rice aside.  Meanwhile, prepare your toppings: roast a pan of sweet potato batons (for about 30 minutes at 450, stirring a few times), pan-fry some tofu (I season mine with equal parts soy sauce and fish sauce plus a pinch of sugar), and slice up some green onions, nori strips, and avocado.  Other possible toppings could include edamame, mushrooms or spinach sauteed in sesame oil, a thinly-sliced egg pancake, raw fish–whatever floats your sushi boat.  Serve rice and toppings separately and let everyone assemble their own bowls.  Garnish with toasted sesame seeds.

Celebrate Spring with a Canning Jar Coddled Egg

Welcome to Emmy Cooks! If you like what you see here, you can sign up on the sidebar to receive recipe updates by email, add the RSS feed to your blog reader, or follow Emmy Cooks on Facebook, Twitter, or Pinterest.

I admit that, at first, I found Seattle a bit too grey. It took me a few years to stop minding the weather and learn to love soup. But that was more than a decade ago, before I realized that it doesn’t rain that much, and when the sun shines it’s incomparably gorgeous. And now I just think of Seattle as having five months of springtime. Starting today.

So happy springtime! Right on schedule, my hens laid their first two eggs of 2012, and when I poked around in the garden I found soft green herbs unfurling from hibernation. The first chives, tender parsley, tart sorrel, green onion shoots, mint. Lunch.

When I read this the other day, I couldn’t believe that it had never occurred to me to coddle an egg in a canning jar. (Is that weird? Really, I couldn’t believe it.) So, as I said, lunch.

To make a Coddled Egg in a Canning Jar, butter a wide mouth half pint canning jar. Crack in two eggs and season with a pinch of salt. I drizzled in a spoonful of cream because I had some in the fridge, then piled in the handful of chopped fresh herbs. You wouldn’t go wrong adding cheese instead of the cream (or, go crazy, use both), but I didn’t. Put the lid on the jar and place it in a pot. Fill the pot with water to just below the jar lid. Remove the jar from the water, bring the water to a simmer, put the jar back in, and simmer 12-15 minutes, depending on how well-cooked you want your yolks. (Think ahead of time about how you will lift the jar from the simmering water. I used a jar lifter, which I own for canning, but I’ve heard of people using tongs with the ends wrapped in rubber bands for traction. If you plan to use this method, you should probably try it first in cold water to make sure it seems safe.)

I love the idea of serving these for brunch with a toppings bar–label the lids with a Sharpie and let everyone assemble their own. With a few pots on the stove you could cook a lot of these at once. Serve with buttered toast.


My Favorite Recipes: January 2012

Don’t worry if you’ve missed a post or two this month, or been torn by so many options–in no particular order, these recipes have been my January favorites.

Zippy Noodle Curry with Tofu, Sweet Potatoes, and Chard


Sunny Side Up Pizza with Potatoes and Eggs


Chocolate Chocolate Chocolate Cookies (although if you want to be eating cookies in 20 minutes, these Easy Little Butterscotch Cookies/Nutella Sandwich Cookies are the way to go)


Winter Vegetarian Chili


and, of course, The Best Soup of 2011


Finally, the crowd favorite (as chosen by most page views): Sweet Potato Pancakes for Someone You Love


Happy Cooking!

Jewel Tone Winter Pasta

I have mentioned before that orange vegetables have favored status with the children in our household.  Which is why, when I have a butternut squash around, my first thought about dinner is usually that I should dice it up and roast it.  My oldest calls the carmelized bites “squash candy,” which isn’t at all wrong (although I don’t go this far).

I, however, am not picky about the color of my food, so long as my plate contains an array of stunning hues.  Ok, so I am picky.  It’s worth it.  Beautiful tastes better.

Luckily, we eat a lot of vegetables, and vegetables are gorgeous.  This pasta has a combination of veggies that I love for their jewel tones almost as much as I love them for their flavor together: butternut squash, kale, red onion, and mushrooms.

I am not an evangelist on this point, but I think this combination is worth trying with whole wheat pasta.  At this time of year especially, I like the robust savor of whole wheat noodles underlying the sweetness of caramelized winter vegetables.  But hey, if that’s not your thing, go ahead and use whatever you’ve got on your shelf.

Jewel Tone Winter Pasta begins with the roasting of a peeled, diced butternut squash tossed with a spoonful of olive oil and a few good pinches of salt.  Roast it at 450 and stir every 10 minutes or so until the cubes start to candy at the edges (about 40 minutes for 1/2″ cubes).  Meanwhile, heat a pot of water to boil pasta.  While it’s heating, find a pan large enough to hold the finished dish and saute a sliced red onion in olive oil on high heat with a pinch of salt until it begins to really brown.  Add a pile of sliced mushrooms and continue cooking until the liquid evaporates and they shine like gold.  Now toss in a big pinch of salt and a shredded head of washed kale, with a few additional spoonfuls of water if necessary to deglaze the pan, and cook until the kale is tender but not mushy.  (Take the pan off the heat if your pasta and squash aren’t ready yet.)  When your squash is nearing perfection, cook whole wheat spaghetti (or your noodles of choice) in salted water for 1 minute less than usual and then drain, reserving a cup of cooking water–the pasta will finish cooking in your pan.  Put your pan back on the heat and combine everything: sauteed veggies, roasted squash, noodles, a splash of olive oil and some good grindings of pepper.  Taste for salt and serve with more pepper at the table, and a little bit of cheese if you’re so inclined.  I love this dish with blue cheese, but fresh goat cheese or grated parmesan would be perfectly acceptable alternatives.

We served this pasta with a spinach salad with fresh pears, dried cherries, sunflower seeds and Creamy Pear Vinaigrette, but it would also be delicious with this lemony Romaine salad with homemade croutons.