Tag Archives: vegetarian

Vegetarian Split Pea Soup

I like to have a pot of soup around.  It can be simmering on the stove or left over in the fridge or even packed away in the freezer–I just like to know it’s there.  I eat a lot of soup.  It’s a quick lunch, an easy dinner, and you can always double the recipe to feed even more of the people you love.  (But let’s be clear: I almost always double the recipe whether company’s coming or not.  See above.)

I make lentil and bean soups often but, strangely, I don’t think I had ever made split pea soup before this week.  You know why? Because the recipes always call for an “optional” ham hock.  Whatever that is.  And I can never believe that recipes calling for “optional” meat are going to be any good if you leave the meat out.   I automatically skip over any recipe that calls for bacon and then implies that the vegetarian version will be just as good if you simply omit the bacon.  The bacon is the FLAVOR in that recipe, and a good vegetarian recipe builds flavors in a different way, through spices and cooking technique.

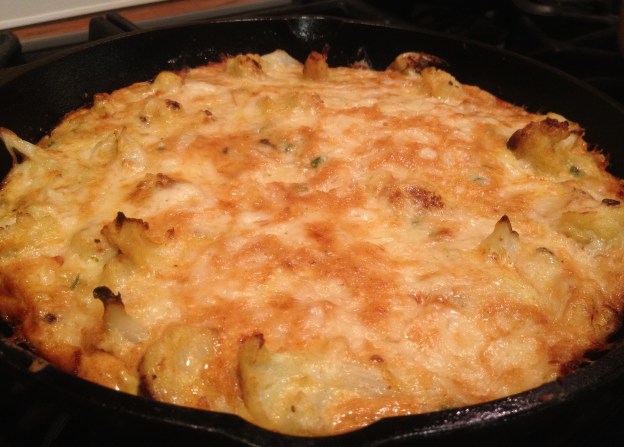
But when I made that Smoky Cauliflower Frittata recently and J said it tasted meaty, I had the obviously-delayed epiphany that the flavors that bacon and ham hocks add are smoke and salt.  I was ready to make split pea soup.  I went right to the source for my recipe: Pea Soup Andersen’s Facebook page.  This recipe is vegetarian in the original, but just to be on the safe side–in case those ham hock recipes are on to something–I replaced the cayenne with hot smoked paprika anyway.

This just the kind of recipe I like: simple, flavorful, hearty. I doubled the recipe, of course, but I supposed you don’t HAVE to.  (A double recipe made a truly huge pot of soup.  The original recipe says it makes 8 bowls, which is a regular-big pot of soup.) 

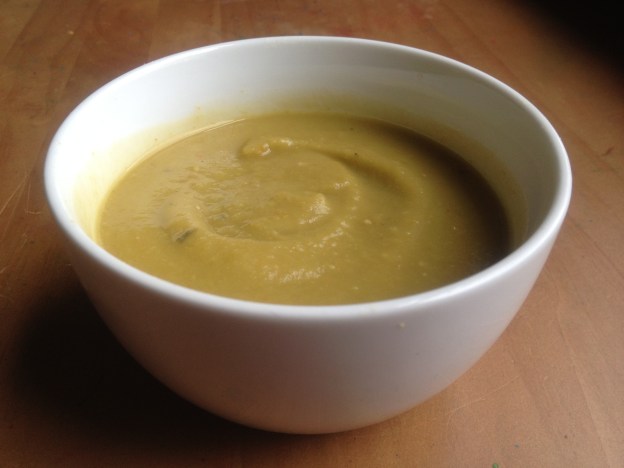
To make a regular-big (not truly huge) pot of Vegetarian Split Pea Soup, dice a large onion, a large carrot and a celery stalk and saute in olive oil until the vegetables soften and the onion is translucent.  Add 1/4 tsp. dried thyme and 1/2 tsp. smoked paprika and stir, then add 2 c. sorted and rinsed green split peas, 8 c. water, a bay leaf and 1 1/2 tsp. salt.  Maintain a peppy boil for 20 mins, then reduce heat and simmer until the split peas are very soft, probably about an hour in all, stirring occasionally.  Season with salt and pepper.  I originally planned to puree the soup, but once I cooked the peas down to mush I loved that texture too.   It tastes great both ways, but I think the pureed version looks a little more elegant.

If you want to get fancy, you could top the soup with another sprinkle of smoked paprika or some homemade croutons.  Or serve it with a nice easy bread or homemade rye crackers.  Or just keep it in the fridge to reheat (thinned with a little water) for lunch this week.

Shaved Brussels Sprout Salad with Lemon, Pecorino and Red Onion

The other day I got to sneak away to one of Seattle’s year-round farmers markets for an hour with a friend.  I hadn’t been to a farmers market for a while and apparently felt that I had to make up for lost time.  I came home with some of my favorite hazelnuts, many pounds of potatoes, rutabagas and turnips, sweet crisp apples, a new supply of Nash’s field peas, and a big bag of Brussels sprouts.  Big.

I’ve had my eye on this salad for a while, and I’m happy to report that it did not disappoint.  The version below is adapted from the Food 52 website, and I’ve updated the recipe title to reflect my own preference for the order in which the flavors should dominate.  As always, one of the joys of cooking at home is that you get to tweak every dish to taste perfect to you.  Go ahead, pile on the cheese or leave the onion out altogether.  You’re the cook.

Any Brussels Sprout Salad is going to start with Brussels sprouts, in this case about 1/2 lb., finely shredded.  (I used the thin slicing blade of my food processor.)  Thinly slice 1/4-1/2 of a small red onion and let it soak in cold water while you make the rest of the salad.  In a small bowl, mix 2 Tbsp. lemon juice, 1 tsp. honey, 1 tsp. whole grain mustard, and a few grinds each of salt and pepper.  Whisk to dissolve honey, then whisk in 1 Tbsp. olive oil and whisk again until the dressing emulsifies.  Pile your Brussles sprouts and drained red onion into a salad bowl, toss with dressing, then add 2 oz. finely grated pecorino cheese and toss again.  Taste and adjust (more lemon?) if that seems like a good idea.

The original recipe says that this salad serves six, but I will get personal here and let you know that J and I polished the whole thing off by ourselves for lunch, alongside a wedge of Smoky Cauliflower Frittata.  I told you we’d be making that again soon. 

Say What You Mean With Homemade Conversation Hearts

I have to start with a few confessions here.  One: This may be the farthest thing from “real food” that will ever grace these pages.  Two: Making homemade conversation hearts is about ten times more cutesy than I am in real life.  Three: Even though I’m trying to play it cool, I secretly had so much fun making these with my three year old.

There are, I suppose, a few good reasons to make your own Valentines Day conversation hearts, especially if you happen to have time to kill and an enormous quantity of powdered sugar on your hands.  The boxed kind have no fewer than five unrecognizable ingredients.  They taste awful.  And they say things like “text me” these days.  Wouldn’t you rather personalize yours with a message like “Marry Me” or “I think we should just be friends”?Conversation Heart Cutouts emmycooks.comEasy peasy.  Enter homemade conversation hearts.  I have quite a fondness for the CakeSpy cookbook Sweet Treats for a Sugar-Filled Life, which inspired this wacky project.  And it was easier than I thought it would be.

Please note that if you are going to get crazy and make these, you should start ASAP.  The hearts need to dry for 24 hours before you can write on them.

DIY Conversation Hearts start with a small bowl, in which you combine 1/2 c. water, 2 tsp. light corn syrup, and 1/4 oz. powdered gelatin.  Whisk well, microwave for 30 seconds, then whisk well again.  Dump mixture into the bowl of your mixer with 1 c. powdered sugar (in case you’re shopping, I used almost 2 1/2 lbs. powdered sugar in all).  Turn mixer on low and slowly incorporate 2 lbs. powdered sugar, scraping the bowl down occasionally.  Turn your sticky dough out onto a surface heavily dusted with MORE powdered sugar and knead like bread dough, adding more powdered sugar as you go, until the dough is satiny rather than sticky.

Divide the dough into as many colors as you want, and knead a few drops each of food coloring and flavoring (I used almond extract) into each ball.  This step is messy; I lined my counter with parchment paper to avoid staining.  I also added more powdered sugar as I worked in the liquid color and flavor.

Roll the dough out 1/8-1/4 inch thick.  Use heart -shaped cutters (I used a set of fondant cutters) to make tiny or almost-tiny hearts.  (Smaller = more realistic. Bigger = easier to write on.)  Pinch the scraps back together and re-roll.  The original recipe said it would make 100 hearts, but it actually made a gazillion.  Really.  More than 500.

Let the hearts dry on parchment paper for 24 hours, then use food coloring markers (like Gourmet Writer Food Pens) to ink the hearts with Valentines messages that express your own true self.  If that means writing “text me,” so be it–at least the recipient will know that you really mean it.

Conversation Heart Scraps emmycooks.com

Roasted Tomatoes, or, How to Coax Summer Flavor from Winter Tomatoes

Winter tomatoes, blah, we all know that.  At least in these latitudes.  When I visited California in December, my mom had a 10-foot Roma tomato plant that had climbed beyond its trellis into the apple tree and was still fruiting as it reached for the winter sky.  Here in Seattle, I can barely get a tomato to ripen in my back yard in September.  But that’s a different story.

This is not, mind you, a recipe for turning a winter tomato into a summer tomato.  There is nothing you can do in mid-February to turn a hard, lifeless winter tomato into the juicy, fragrant, wonderous thing that a summer tomato is.  This is a recipe for something different altogether.  Something jammy and sweetish, but with the acid undertones of tomato flavor.  Something with a little chew and a little luscious pulp and juice.  Something you will want to eat a lot of.

In the summertime, I like to buy tomatoes by the box to roast and freeze for winter.  We use them all year on pizzas, in soups and pastas and sandwiches, in pots of white beans.  They’re great with roasted garlic, or smeared onto a piece of toast with fresh goat cheese.  But eventually we run out.  These roasted tomatoes can be used in all the same ways.

Roasted Tomatoes take some time, so start early or make a batch on the weekend to use throughout the week.  Quarter Roma tomatoes and place them on a baking sheet with a handful of thyme sprigs.  Drizzle with olive oil and a little balsamic vinegar, which will sweeten as it reduces, and sprinkle lightly with salt.  Bake at 275 for a long, long time.  Maybe two hours.  You want the edges to begin to brown and the bodies to collapse into a succulent, semi-dried state.  Taste one.  If it is watery, or if it still says winter tomato to you, leave it in a bit longer.

These tomatoes would be darn tasty, come to think of it, on yesterday’s homemade spinach pasta.  We’ll have to make that again soon.


Eat Your Greens: Easy Handmade Spinach Pasta

Sometimes, as a threat, I tell my children that there were times, like maybe in the 1950s, when children weren’t even allowed INTO the kitchen.  They had to PLAY OUTSIDE until dinner was ready.  They did not ever get to help cook, and they CERTAINLY were not allowed to gambol about the cook’s feet or play frisbee with the tupperware lids to entertain the baby.  My children stare at me, slack-jawed and wide-eyed.  Being banned from the kitchen is as bad a fate as they can imagine.

In fact, many evenings when I head into the kitchen to start thinking about dinner, they beat me there, pulling their stepladders up to the counter.  “How can we help?”  They measure as we bake, pile cut veggies onto the tray to roast, push the buttons on the machines.  They find the pots, help set the table, and enthusiastically stir clouds of flour and glops of sauces right onto the floor.

So when my little chefs make a dinner request, I like to indulge them.  The other night my five year old requested stracci di pasta.  Actually, what she said, with a bordering-on-maniacal gleam in her eye, was “Mama, can we make that pasta where we get to cut it up by ourselves WITH A SHARP KNIFE?”  (Sharp knives–even not VERY sharp knives–are exciting to the preschool set.)  Indeed we could.

Homemade egg pasta is actually very easy if you have a pasta roller.  If you don’t, forget it, borrow a friend’s and then come back for the recipe.  We made ours with spinach both for the emerald color and because I want my kids to cook with and eat vegetables on purpose (as opposed to only hidden-in-their foods veggies, which seems to be a trend).  This recipe, like many of my favorites, started its life in Deborah Madison’s Vegetarian Cooking for Everyone.

Fresh Spinach Pasta starts with two c. lightly packed spinach leaves blended with two eggs until liquid.  Mix 2 c. flour with 1/4 tsp. salt in a mixer/food processor/bowl then add the liquid while stirring or mixing on low speed.  The dough will be quite crumbly but if it is unworkably dry or sticky you can adjust with a spoonful of water or flour.  Turn out onto a cutting board and knead until smooth.  Cover and let rest 15 minutes.  Cut dough into 4-6 pieces and flatten each into a rough rectangle.  Set your pasta roller to the widest setting and roll the dough through, then fold in half or thirds and roll again to continue kneading the dough.  Do this a few times, then stop folding and start thinning out the dough by running it through the machine on progressively thinner settings.  When your pasta is suitably thin, repeat with remaining dough.  Let your kids cut the pasta into stracci (“little rags”), or fold it as shown and slice into noodles.  (If the pasta seems at all sticky, flour it lightly for this step.)  Pull apart into a pile of noodles and toss with a few pinches of flour to keep the noodles from sticking.  Cook in a boiling pot of salted water for a few minutes, tasting as you go (cooking time will depend on the thickness of your pasta).

We drained our pasta and tossed it into a pan of puttanesca-style sauce: olive oil, garlic, capers, tomatoes, red pepper flakes, dried oregano, and a few more handfuls of spinach.

Smoky Cauliflower Frittata

I love my garden and I love my CSA, both of which I treasure for the fresh, delicious, seasonal food they bring into my kitchen.  But I have to admit to a guilty pleasure: the off season.  When I get to select each and every vegetable myself just because I feel like eating it this week.  When I don’t have a bumper crop of arugula or zucchini demanding that I make pesto or relish.  When I don’t have to resist buying some enticing vegetable because my CSA box is groaning under the weight of other harvest bounty.  (I know, some people have real problems, right?)

So anyway, this week, I just up and bought two heads of cauliflower.  I did!  And after you make this frittata for the first time with the reasonable single head of cauliflower you will no doubt purchase at first, I am pretty sure that you will hurry back to the store for two more heads of cauliflower as well.  Just in case you have to make the frittata twice more in rapid succession.  Which might be my plan.

The smokiness here comes from a combination of smoked cheese and smoked paprika, another could-be-overkill-but-isn’t epiphany from the Ottolenghi cookbook Plenty.  I wouldn’t normally say that smoked cheese is my thing, but this frittata is something.  Something good.  J says it tastes meaty.  He means that as a compliment.

This Smoky Cauliflower Frittata would be excellent at any meal, and it is flavorful enough that you could cube it up to serve as a bite-sized party snack (or, you know, a straight-from-the-fridge snack).  In salted water, parboil a small cauliflower, including the stem, cut into medium pieces.  Drain well, then saute in an ovenproof pan with 2 Tbsp. olive oil until the edges of the florets begin to turn golden brown.  Meanwhile, heat oven to 375 and grate and toss together 5 oz. smoked cheese (I used Beechers) and 2 oz. aged cheddar.  In a large bowl, thoroughly combine 6 eggs, 1/4 c. greek yogurt (the original recipe called for creme fraiche), 2 Tbsp. dijon and 2 tsp. sweet smoked paprika, then stir in 3 Tbsp. finely chopped chives and 3/4 of the grated cheese (reserve the remaining cheese for later).  Season well with salt and pepper.  When the cauliflower florets look nice and toasty, pour the egg mixture over the cauliflower and use a fork to distribute the cauliflower and cheese evenly around the pan. Cook about 5 minutes over medium heat.  Scatter remaining cheese on top, move to oven, and cook 10-12 minutes more until the frittata is nearly set.  I like to finish by turning the oven up to a broil for a couple of minutes at the end (leaving the pan on the middle rack) to slightly brown the top.  Let rest a few moments, then serve hot.  (Most frittatas are also great cold or at room temperature, but I preferred this one hot.)  I served it with a plain green salad dressed with this lemony vinaigrette.

Got Tortilla Chips? Make Chilaquiles!

I understand that Super Bowl Sunday is a day devoted to snacking excess.  But when it’s all over, and you’re looking to recover with a healthy meal this week, try this recipe.  (Or make it right away without the cheese to knock the socks off the vegans at your Super Bowl party–in which case you should call it “Vegan Nachos.”)

I don’t think that this bowl of spicy, smoky, chipotle-spiked deliciousness technically qualifies as chilaquiles, but that’s what we call it.  And it’s what Jack Bishop calls it in A Year in A Vegetarian Kitchen.  Based on my exhaustive research (read: eating my way through Oaxaca a few years ago), this dish may really be closer to enfrijoladas.  But whatever.  I’m no purist.  You can do some research on Wikipedia and make your own decision.

A few notes on the ingredients.  A more authentic recipe would have you quarter corn tortillas and fry them (or, more realistically around here, bake them in the oven) until crisp.  But THIS recipe uses tortilla chips.  It’s a time-saving shortcut, and you are going to have all those leftover bags of chips after your Super Bowl party.  But if you prefer to start with corn tortillas, more power to you, just brush both sides with oil, sprinkle with salt, cut them into 1/2″ by 2″ strips and bake them at 350 until they start to crisp (maybe 10-13 minutes), then set them aside to cool while you do the rest.  And about the chipotle puree: buy a can of chipotle chiles in adobo sauce, scrape the entire contents into your blender, and whizz to a puree.  Keep it in a jar in your fridge.  Use it on everything.  Now back to the chilaquiles.

The backbone of this Chilaquiles recipe is your pot of beans.  Chop a big onion and brown it in a pot over medium-high heat.  When the onion gets a few shades past golden brown, mix in 5 minced garlic cloves and 1-2 tsp. chipotle puree. Notice that your kitchen is starting to smell great.  Add 4 cups cooked or canned black beans (if you cooked the beans yourself, add the liquid.  If they’re canned, drain and rinse them).  Add enough additional water to nearly cover the beans.  Add 1/2 to 1 1/2 tsp. salt (depending on whether the the beans are already salted) and simmer for about 20 mins to blend the flavors.  Puree with an immersion blender and add more salt to taste.  Serve with tortilla chips and assorted toppings: salsas, mexican crema (or sour cream thinned with milk), diced avocado, lime wedges, queso fresco or feta cheese and chopped cilantro.  The photo above also shows a bowl of pickled onions and hot peppers I had left over from making fish tacos.  Everyone grabs a bowl, adds a handful of chips and a ladle of beans, then toppings to taste.  Buen provecho!

Put a Fried Egg on Your Pasta

Ok, so I’ll give you that this is more of a tip than a recipe.  But I promise you this: a salty, garlicky, spicy plate of pasta is even better with a fried egg on top.

Image

Simple Brown Rice Sushi Bowl

There is an extensive list of finicky cooking tasks that J & I don’t do anymore.  Making sushi for a crowd is on that list.  Love the flavors, hate the time it takes to assemble and slice 20 rolls.  This is an easy way out, and can easily be scaled to feed many or a few.

To make this Simple Brown Rice Sushi Bowl spread, start by making a pot of cheaters’ sushi rice.  Bring to a boil one part short-grain brown rice in two parts water with 1/2 tsp. salt per cup of rice, then lower the pot to a simmer for 40 minutes.  Remove from heat and leave covered for 5 minutes (I put a clean dishtowel under the lid to absorb some moisture), then fluff with a fork and stir in seasoned rice vinegar and additional salt to taste.  Set rice aside.  Meanwhile, prepare your toppings: roast a pan of sweet potato batons (for about 30 minutes at 450, stirring a few times), pan-fry some tofu (I season mine with equal parts soy sauce and fish sauce plus a pinch of sugar), and slice up some green onions, nori strips, and avocado.  Other possible toppings could include edamame, mushrooms or spinach sauteed in sesame oil, a thinly-sliced egg pancake, raw fish–whatever floats your sushi boat.  Serve rice and toppings separately and let everyone assemble their own bowls.  Garnish with toasted sesame seeds.

Celebrate Spring with a Canning Jar Coddled Egg

Welcome to Emmy Cooks! If you like what you see here, you can sign up on the sidebar to receive recipe updates by email, add the RSS feed to your blog reader, or follow Emmy Cooks on Facebook, Twitter, or Pinterest.

I admit that, at first, I found Seattle a bit too grey. It took me a few years to stop minding the weather and learn to love soup. But that was more than a decade ago, before I realized that it doesn’t rain that much, and when the sun shines it’s incomparably gorgeous. And now I just think of Seattle as having five months of springtime. Starting today.

So happy springtime! Right on schedule, my hens laid their first two eggs of 2012, and when I poked around in the garden I found soft green herbs unfurling from hibernation. The first chives, tender parsley, tart sorrel, green onion shoots, mint. Lunch.

When I read this the other day, I couldn’t believe that it had never occurred to me to coddle an egg in a canning jar. (Is that weird? Really, I couldn’t believe it.) So, as I said, lunch.

To make a Coddled Egg in a Canning Jar, butter a wide mouth half pint canning jar. Crack in two eggs and season with a pinch of salt. I drizzled in a spoonful of cream because I had some in the fridge, then piled in the handful of chopped fresh herbs. You wouldn’t go wrong adding cheese instead of the cream (or, go crazy, use both), but I didn’t. Put the lid on the jar and place it in a pot. Fill the pot with water to just below the jar lid. Remove the jar from the water, bring the water to a simmer, put the jar back in, and simmer 12-15 minutes, depending on how well-cooked you want your yolks. (Think ahead of time about how you will lift the jar from the simmering water. I used a jar lifter, which I own for canning, but I’ve heard of people using tongs with the ends wrapped in rubber bands for traction. If you plan to use this method, you should probably try it first in cold water to make sure it seems safe.)

I love the idea of serving these for brunch with a toppings bar–label the lids with a Sharpie and let everyone assemble their own. With a few pots on the stove you could cook a lot of these at once. Serve with buttered toast.