Category Archives: My Favorite Recipes

Quinoa Cakes with Cheese, Garlic, and Herbs

I think it’s getting to be a dated notion that a big chunk of meat is the most essential component of any meal.  But if you’re trying to eat vegetarian meals more often, sometimes it might feel like the “centerpiece” of the meal is missing.  I sometimes struggle with this although I’ve been mostly vegetarian for many years, and I always marvel at how effortlessly a meal comes together when I’m serving a piece of fish.  Of course it’s often fine not to have one food be the main attraction, but sometimes it’s nice to have a focal point of a vegetarian meal.

These quinoa cakes fit the bill nicely.  They’re high in protein, low in effort (especially if you have some leftover plain or seasoned cooked quinoa), and their tidy presentation looks great on a plate.  They could easily be served with a veggie side and/or salad for lunch or dinner.  I made them for breakfast with salsa and sliced avocado, although they would also have been great topped with a fried egg.  (Isn’t everything?)  They’re versatile, I’m telling you.  And tasty.

As usual, this is more of a template than a recipe.  You can find a recipe, the one that this dish is based on, in Heidi Swanson’s Super Natural Every Day cookbook.  But I say wing it.  You could stuff these with veggies, make them gooey cheesy, or spice them up with hot pepper.  The essentials here are the quinoa, some eggs and breadcrumbs to hold it all together, alliums and herbs for flavoring, and some cheese (or salt!) for salt. Continue reading Quinoa Cakes with Cheese, Garlic, and Herbs (click for recipe)

French Toast with Vanilla and Orange Zest

I hope that you have some loaves of challah in the oven or the bread box, because you are going to want to make this French toast this weekend.  Lots of the recipes I have posted here are old favorites, but this one is a new favorite.  It’s Ina Garten’s recipe but Sonia made it for me recently, and then I made it again, and frankly, it’s the reason we’ll be baking challah again tomorrow.

Vanilla.  Orange Zest.  Crisp, buttery edges.  Custardy centers.   A drizzle of pure maple syrup, a tumble of fruit, a steaming mug of coffee.  Weekend mornings don’t get better than this.

French Toast with Vanilla and Orange Zest:  In a wide bowl or pan, whisk 6 eggs with 1 1/2 c. milk, 1 Tb. honey, 1/2 tsp. vanilla, 1/2 tsp. kosher salt, and the zest of one orange.  Soak 3/4 inch slices of challah for 5 minutes, turning once.  Cook in plenty of butter over medium heat until nicely browned on each side (meanwhile, get the next batch of bread soaking in the egg mixture).  Transfer to a 250 degree oven while you cook the remaining slices.  Serve with maple syrup and fruit.

The Best Red Lentil Soup of 2012

It’s no secret around here that I like to cook big when I can.  A big pot of beans, a big pot of soup, a big pot of chili.  Doubling a recipe saves time and isn’t much more work than making a single recipe.  Usually when I double up, I’m feeding a crowd or making one meal for tonight’s dinner and another to freeze for another time.  But then there are occasions when I make a huge pot of something and just eat it twice a day for a week.  This soup is one of those somethings.  It’s that good.

You might think that March 2 is a little early to be declaring anything the “Best of 2012.”  But I’m pretty sure.  I’ve had a go-to red lentil soup recipe for years (it was The Best Red Lentil Soup of 2008 or thereabouts, and has held the title since).  This soup has replaced it with a vengeance.

I knew it would be good, because it was recommended to me by the same friend who gave me that amazing chilaquiles recipe.  She is a great cook and discerning recipe collector, and when she tells me to try something I always do.  This recipe is slightly adapted from 101 Cookbooks, which is another good sign, because I always like Heidi Swanson’s flavorful and sometimes quirky cooking.  In this case her stroke of genius is to add raisins to the soup, which plump up into barely-there bursting bits of sweetness mingled with the curry and coconut flavors.  In case you are feeling cautious to begin with, I will give you the regular-size recipe and you can use your discretion as to doubling it.  (You definitely will next time.)

The Best Red Lentil Soup of 2012: Bring 1 c. red lentils and 1 c. yellow split peas (both picked over and well-rinsed) to a boil in 7 c. water.  Reduce heat to a simmer, add a chopped carrot and 2 tsp. finely minced ginger (I like to grate it with my Microplane), and simmer until split peas are entirely soft, 30-45 minutes.  Meanwhile, heat a gob of coconut oil in a separate pan and saute a bunch of chopped green onions (reserve a handful for garnish) with 2 more Tbsp. minced ginger and 1/3 c. golden raisins.  After two minutes, add 2 Tbsp. Indian curry powder and saute for another minute, stirring constantly, then add 1/3 c. tomato paste and stir for one minute more.  When the lentils and peas are soft, add the tomato-spice mixture to the soup with a can of coconut milk and 2 tsp. salt.  Simmer uncovered for a bit to blend the flavors and thicken the soup; you can adjust the consistency with more water or more cooking.  Serve over cooked brown rice, garnished with those reserved chopped green onions, chopped cilantro, and a dollop of Greek yogurtIf you try this and know of a better red lentil soup recipe, please let me know in the comments.  I never get tired of lentil soup.

How to Cook Black Beans

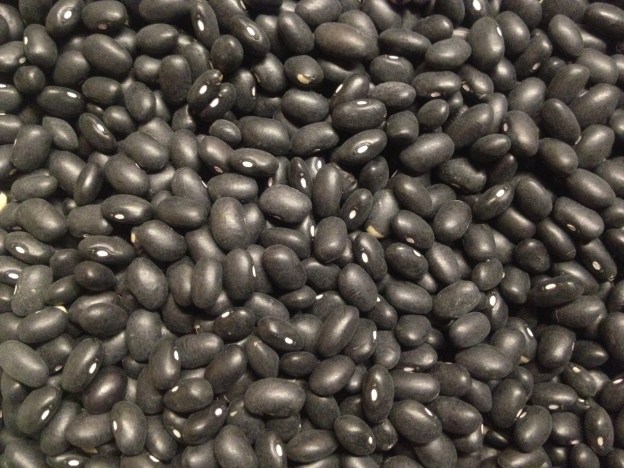
Writing about cooking lately has made me reflect on the fact that we think that cooking is harder than it really is.  Take making a pot of beans.  Simple, really.  Beans, water, salt.  That pot will feed you for a long time.  Cooked beans freeze well.  Dried beans cost a fraction of what you pay for canned beans.  Canned foods, including beans, can contain unsafe levels of BPA as well as excessive sodium and preservatives.  And still–still!–it wasn’t until a few years ago that I started using dried beans almost exclusively.  It seemed like too much trouble to cook my own.

So it is with the zeal of a convert that I implore you to set aside a few hours some weekend to cook a pot of beans.  I’m not saying the canned kind are wrong, and I always keep a few cans in my pantry just in case, but there are so many good reasons to cook dried beans yourself.

Once you decide to make the leap, it’s hard to go wrong.  You can soak your beans, or not.  You can salt them as they cook, or wait until the end.  You can use this season’s beans from a crunchy co-op that has amazing dried bean turnover, or cook up the bag that’s been hiding in the back of the cupboard for years.  Despite the vast number of opinions on each of these topics, in my experience you can tune all that out and your beans will turn out just fine.

Ready?  Good.  First, keep an eye on your beans as you take them from the bag or jar to make sure that there are no little rocks mixed in.  Second, measure them out so you have an idea of how much salt to add later.  Finally, give them a good rinse before putting them into your pot.

I like to soak my beans only because it speeds the cooking time on the stove (and thus the actual supervision required).  You can soak your beans covered by a few inches of water overnight, or you can “quick soak” them: put them in a pot, bring it to a full boil for one minute, then turn off the heat and leave your covered pot alone for an hour.  At this point you can drain the beans, or not.  (Some claim that draining the water after an initial soak helps make the beans more digestible.  Others say you’re just pouring valuable nutrients down the drain.  No worries.  Your beans will be great either way.)

So now your black beans (soaked or unsoaked) are in your pot.  Cover the beans with a few inches of water.  (This can be the soaking water if you soaked the beans, or new water.)  Bring the pot to a boil for a few minutes, skimming off any foam that gathers, then reduce the heat to a simmer.  At this point you can leave the beans completely plain, or add any additional flavorings you’d like: some chopped onion, chopped jalapenos, dried epazote, dried oregano, crushed garlic cloves, chopped cilantro stems, whatever.  I usually make my beans rather plain, then add more flavorings later.  Leave the simmering pot partially or fully covered.  Cook for at least half an hour if you soaked the beans, or an hour if you didn’t, then taste a bean.  Once they begin to soften, add about 3/4 tsp. salt per cup of dried beans that you started with.  Continue cooking until beans are completely soft.  This may take two hours or more if you are using unsoaked beans.  (The cooking time will vary according to the beans’ freshness; even soaked beans can take nearly two hours if they are quite old.)  If the water seems to be getting low, add more boiling water.  If there is too much water when the beans are done, pour some off.  Taste the beans as you go.  If they don’t taste great to you, they probably need more salt.  Add a small amount at a time and simmer for a few minutes to let it soak in before tasting again.

Looking for ideas to use up your delicious pot of black beans?  Mix with rice, top with salsa and it’s dinnertime.  Or click the “Mexican Flavors” link on the sidebar for emmycooks recipes (like maybe these chilaquiles?) that await your black beans with open arms.Some Recipes to Show Off your Black Beans:

Black Beans with Cilantro and Lime
Chilaquiles
Vegetarian Taco Salad
Quinoa Chili with Red Peppers
Enchilada Bake with Black Beans and Tofu
Huevos Rancheros
Winter Wheat Berry Chili
Southwestern Frittata with Peppers, Black Beans, and Cheddar
Black Bean Tacos

My Favorite Recipes: February 2012

It was difficult to choose my favorite recipes from this month! My top five recipes below were all new to me this month, so they are ones that I am newly excited about. But I also cooked several of my old standbys, so make sure you scroll back through this month’s posts to find your own new favorites.Favorite Recipes Collage Feb 2012

Celebrate Spring with A Canning Jar Coddled Egg
Smoky Cauliflower Frittata (or, even simpler: Roasted Cauliflower)
Shaved Brussels Sprout Salad with Lemon, Pecorino and Red Onion
Pasta with Garlic, Anchovies, Chili and Breadcrumbs
Quick Whole Wheat Spice Bread with Brown Sugar, Orange Zest and Walnuts
And last but not least, a readers’ favorite: Eat Your Greens: Easy Handmade Spinach Pasta

Thank you for reading and cooking along with me!  And welcome to the many new readers who have joined us this month.  To receive daily recipe updates, you can subscribe to this blog via RSS or email, or follow @emmycooks on Twitter (links on the sidebar).  And special thanks to The Kitchen’s Garden Project and Cook Every Day for your recognition of emmycooks this month.

And finally, hey, maybe a recipe index would be helpful around here.  If you have created one and have any tips for me, will you please leave me a note in the comments?  Thank you!

Quick Whole Wheat Spice Bread with Brown Sugar, Orange Zest and Walnuts

This afternoon, as my five year old drifted off to napland, she  opened her eyes to dreamily ask, “Mommy, after my nap, can I have TWO MORE PIECES of that bread you made, with butter?”  I smiled and nodded, and she was fast asleep.  Inspiring that kind of delight is the best reward a cook can hope for, in my book.

It’s lucky that this recipe makes two loaves of bread, because my family started  hovering around the cooling rack the moment the bread came out of the oven.  The source of this recipe, Cheryl Sternman Rule (writer of this lovely blog), calls it “Toasting Bread.”  She advises you to cool the bread completely before slicing,  toasting, and spreading it with honey butter.  I am here to tell you that the “letting it cool” part will be very difficult.  We could not withstand the siren scent and ate most of the first loaf warm, slathered in salted butter.  It was heavenly.  Lest it appear that I am contradicting Ms. Rule, however, I should add that the loaf we could bear to let cool was indeed delicious toasted.Quick Whole Wheat Spice Bread with Brown Sugar, Orange Zest and Walnuts: Grease two loaf pans well with softened butter.  Whisk an a egg in large bowl, then whisk in 3 Tbs. honey, 1 c. dark brown sugar and 1 1/2 c. milk.  Zest two oranges directly into the bowl.  Trade your whisk for a wooden spoon or spatula and stir in the dry ingredients: 2 c. whole wheat flour, 2 c. all-purpose flour, 3/4 tsp. ground cloves, 1/2 tsp. salt, and 4 tsp. baking powder.  Mix well, then add 1 c. chopped walnuts and mix again.  Divide batter between your two prepared pans.  Bake at 350 for 45-50 minutes, until a toothpick tester comes out clean.  Remove from pans and cool on a rack.  Hover over the bread, inhaling deeply, resisting as long as you like, then serve toasted (or still warm) with butter.


Roasted Cauliflower

Yesterday got me thinking about flavorful vegetarian cooking.  I have been a vegetarian (or, now, a mostly-vegetarian, with apologies to those who are offended by the concept) for my entire cooking life.  So I have never relied on meat to flavor my food.  What do I rely on?  Vegetables, heat applied to vegetables, fat, salt, spices and herbs.  I also know and revel in the range of textures and flavors that each vegetable can provide on the plate: a beet can be meltingly sweet and earthy or brightly crisp and bracingly imbued with lemon or ginger.  Fennel can be a licorice tangle of crunch, a whisper of greens in a salad, or carmelized to a sweet and savory mush that is barely haunted by anise flavor.  And I get excited every time I discover a novel way to cook a vegetable.

By way of illustrating the range of a humble vegetable, I thought I’d share a very simple but utterly delicious recipe for roasted cauliflower.  Compare it to this simple, creamy 5-ingredient Cauliflower Soup (cauliflower, onion, olive oil, water, salt).  Compare it to this Smoky Cauliflower Frittata.  You can take a cauliflower in a lot of directions.  But once it’s roasted, that’s pretty much the end of the line for a cauliflower in our house.  It often gets eaten off the sheet pan before dinner is even on the table.

Roasted Cauliflower: Chop one head of cauliflower (or two, if you want one left to put on the table with dinner) into medium florets, and chop the remaining stem into slightly smaller pieces.  If the leaves are large, chop them as well, otherwise leave them whole.  Pile onto a roasting pan, including the tiny bits–these will brown into delicious little salty bites.  Toss with olive oil and salt and roast at 450.  Turn with a tongs after 20 minutes, then every 10 minutes after that, until they are nice and brown on all sides (about 45 minutes total).  Hide from passers-by until serving.


Pasta with Garlic, Anchovies, Chili and Breadcrumbs

Sometimes things don’t go according to plan.  I am going to have to update my tagline: “daily recipes…except when I have two sick kids.”  I am also revising my Valentines Day plans for the same reason.  Out with the heart-shaped foods and chocolate desserts.  In with a dinner that takes 25 minutes to make but still says “I love you.”

This recipe is one of J’s favorites.  It comes from one of our favorite Seattle restaurants, Anchovies and Olives, where it is “Bigoli with Garlic, Chili, and Anchovy.”  If you want to make bigoli, more power to you.  If you want a similar-shaped dry pasta, you can use bucatini.  If you want the texture of a fresh pasta, which I do like with the crispy breadcrumbs, you could use any long noodle.  If you just have a box of spaghetti in your cabinet, get it out, it will be great.

Pasta with Garlic, Anchovies, Chili and Breadcrumbs: Put a big pot of water on high heat, and add salt and 1 lb. pasta when it boils.  In a separate small pan, make garlic-infused breadcrumbs by gently heating a couple Tbsp. olive oil with a few smashed cloves of garlic.  Meanwhile, pulse and then grind a few slices of bread to crumbs in your food processor.  Remove the golden cloves of garlic from the oil and enjoy them on chunk of bread while you continue cooking (you have a glass of wine, too, maybe?)–or share them with your Valentine.  Toss the fresh breadcrumbs into the garlic oil and stir occasionally over low heat until they are golden and crisp.  Season with salt and set aside.  Once the breadcrumbs get started in the garlic oil, get another pan (this one big enough to hold the finished dish) on the stove.  Heat 1/4 c. olive oil over medium-low heat with three sliced cloves of garlic, 1 tsp. chili flakes and 12 drained and chopped oil-packed anchovies.  Stir occasionally until the garlic softens and the anchovies melt into the oil.  When your pasta is nearly cooked to your liking, drain and add it to the anchovy sauce pan with 1/4 c. chopped parsley. Toss and continue cooking until pasta is perfectly cooked, tasting and adjusting with more oil or chili flakes if you like.  Serve each bowl topped with a generous spoonful of breadcrumbs.

If you want to gild the lily, you can serve this dish (or your reheated leftovers) topped with a fried egg.

Shaved Brussels Sprout Salad with Lemon, Pecorino and Red Onion

The other day I got to sneak away to one of Seattle’s year-round farmers markets for an hour with a friend.  I hadn’t been to a farmers market for a while and apparently felt that I had to make up for lost time.  I came home with some of my favorite hazelnuts, many pounds of potatoes, rutabagas and turnips, sweet crisp apples, a new supply of Nash’s field peas, and a big bag of Brussels sprouts.  Big.

I’ve had my eye on this salad for a while, and I’m happy to report that it did not disappoint.  The version below is adapted from the Food 52 website, and I’ve updated the recipe title to reflect my own preference for the order in which the flavors should dominate.  As always, one of the joys of cooking at home is that you get to tweak every dish to taste perfect to you.  Go ahead, pile on the cheese or leave the onion out altogether.  You’re the cook.

Any Brussels Sprout Salad is going to start with Brussels sprouts, in this case about 1/2 lb., finely shredded.  (I used the thin slicing blade of my food processor.)  Thinly slice 1/4-1/2 of a small red onion and let it soak in cold water while you make the rest of the salad.  In a small bowl, mix 2 Tbsp. lemon juice, 1 tsp. honey, 1 tsp. whole grain mustard, and a few grinds each of salt and pepper.  Whisk to dissolve honey, then whisk in 1 Tbsp. olive oil and whisk again until the dressing emulsifies.  Pile your Brussles sprouts and drained red onion into a salad bowl, toss with dressing, then add 2 oz. finely grated pecorino cheese and toss again.  Taste and adjust (more lemon?) if that seems like a good idea.

The original recipe says that this salad serves six, but I will get personal here and let you know that J and I polished the whole thing off by ourselves for lunch, alongside a wedge of Smoky Cauliflower Frittata.  I told you we’d be making that again soon. 

Eat Your Greens: Easy Handmade Spinach Pasta

Sometimes, as a threat, I tell my children that there were times, like maybe in the 1950s, when children weren’t even allowed INTO the kitchen.  They had to PLAY OUTSIDE until dinner was ready.  They did not ever get to help cook, and they CERTAINLY were not allowed to gambol about the cook’s feet or play frisbee with the tupperware lids to entertain the baby.  My children stare at me, slack-jawed and wide-eyed.  Being banned from the kitchen is as bad a fate as they can imagine.

In fact, many evenings when I head into the kitchen to start thinking about dinner, they beat me there, pulling their stepladders up to the counter.  “How can we help?”  They measure as we bake, pile cut veggies onto the tray to roast, push the buttons on the machines.  They find the pots, help set the table, and enthusiastically stir clouds of flour and glops of sauces right onto the floor.

So when my little chefs make a dinner request, I like to indulge them.  The other night my five year old requested stracci di pasta.  Actually, what she said, with a bordering-on-maniacal gleam in her eye, was “Mama, can we make that pasta where we get to cut it up by ourselves WITH A SHARP KNIFE?”  (Sharp knives–even not VERY sharp knives–are exciting to the preschool set.)  Indeed we could.

Homemade egg pasta is actually very easy if you have a pasta roller.  If you don’t, forget it, borrow a friend’s and then come back for the recipe.  We made ours with spinach both for the emerald color and because I want my kids to cook with and eat vegetables on purpose (as opposed to only hidden-in-their foods veggies, which seems to be a trend).  This recipe, like many of my favorites, started its life in Deborah Madison’s Vegetarian Cooking for Everyone.

Fresh Spinach Pasta starts with two c. lightly packed spinach leaves blended with two eggs until liquid.  Mix 2 c. flour with 1/4 tsp. salt in a mixer/food processor/bowl then add the liquid while stirring or mixing on low speed.  The dough will be quite crumbly but if it is unworkably dry or sticky you can adjust with a spoonful of water or flour.  Turn out onto a cutting board and knead until smooth.  Cover and let rest 15 minutes.  Cut dough into 4-6 pieces and flatten each into a rough rectangle.  Set your pasta roller to the widest setting and roll the dough through, then fold in half or thirds and roll again to continue kneading the dough.  Do this a few times, then stop folding and start thinning out the dough by running it through the machine on progressively thinner settings.  When your pasta is suitably thin, repeat with remaining dough.  Let your kids cut the pasta into stracci (“little rags”), or fold it as shown and slice into noodles.  (If the pasta seems at all sticky, flour it lightly for this step.)  Pull apart into a pile of noodles and toss with a few pinches of flour to keep the noodles from sticking.  Cook in a boiling pot of salted water for a few minutes, tasting as you go (cooking time will depend on the thickness of your pasta).

We drained our pasta and tossed it into a pan of puttanesca-style sauce: olive oil, garlic, capers, tomatoes, red pepper flakes, dried oregano, and a few more handfuls of spinach.