Tag Archives: vegetarian

Cauliflower and Cheddar Soup

There was a thoughtful post today on The Yellow House that asked whether cooking has become so fetishized that it has begun to seem inaccessible to home cooks.  It reminded me of the brouhaha over models’ bodies: if you see too many airbrushed glossy spreads, do you forget what normal looks like, and maybe start to doubt yourself for not looking so perfect?  I don’t think it’s crazy to think that TV cooking shows and perfect Pinterest culinary glamshots might similarly intimidate novice or busy home cooks.

For my part, I try to remember that it can be easy to get nourishing food on the table quickly, and I try not to let the perfect be the enemy of the good.  Use what you have. Make it easy for yourself.  While I have been trying to include a few photos of my recipes so you know what you’re getting yourself into, none of the food we love to eat is magazine-good-looking aside from the natural beauty of vegetables themselves.  And if I zoomed out, most days you’d see photos that look a bit like Mama Nervosa’s This Is Not A Lifestyle Blog series.

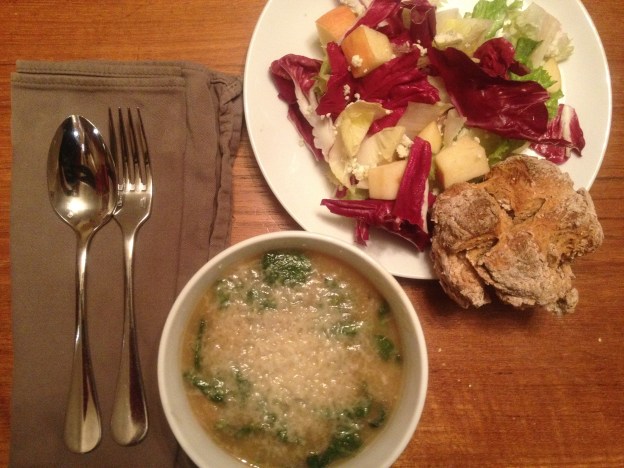
Home cooking is messy and sometimes unglamorous.  Home cooks don’t use mise en place unless everything has to go into the pan at the same instant.  We’re clearing space for the cutting board on messy counters.  And we sure don’t have dishwashers tidying up after us as we go.  If you’re me, you might even burn three separate pots in one night trying to make one simple soup.  (First: the butter.  Second: the onions.  Third: half the croutons.)  Oh, well.  Luckily I only set the fire alarm off once.  To enjoy home cooking is to embrace these moments and circumstances.

And the soup was delicious.

Cauliflower and Cheddar Soup, adapted from Heidi Swanson’s Super Natural Every Day:  Heat a knob of butter in a pan over medium-high heat (don’t burn it).  Add a chopped onion and a couple of chopped shallots with a big pinch of salt and saute until the onion softens.  Stir in a peeled, finely diced potato, cover, and cook for a few more minutes (check and stir your pot, don’t burn it).  Uncover and add 2 minced cloves of garlic and 3 1/2 c. water or stock.  (I was in a hurry so instead of defrosting stock I used boiling water and 1 cube of Rapunzel herb and sea salt bouillon.)  Raise the heat, and once it boils, taste a potato.  When potatoes are tender, stir in a small head of chopped-up cauliflower (or half of a big head) and cook about 5 more minutes until cauliflower is tender as well.  Puree soup, then stir in 1/2 c. grated sharp cheddar cheese and 1-2 Tbsp. dijon mustard.  Taste and adjust flavors with additional salt, cheese, and/or mustard.  Serve garnished with more cheese and butter-toasted croutons (don’t burn them!). I made my croutons from this Whole Wheat Spice Bread with Brown Sugar, Orange Zest, and Walnuts, of course, but if you weren’t able to save any of that I certainly understand.  The croutons in the original recipe look great as well: 3 c. cubed bread bathed in 2 Tb. each melted butter and olive oil, whisked with 1 1/2 Tb. dijon and 1/4 tsp. salt.  Bake 10-15 mins at 350, turning occasionally.

Baked Sweet Potato Fries

End of the weekend.  A sweet one, full of friends, that left the kitchen a disaster.  Everyone’s gone, kids are sleeping, we’re talking in the kitchen.  I’m eating sweet potato fries.  Cold.  Off a cookie sheet.

Casually at first–there are only a few left, it seems easier than putting them away.  I absent-mindedly take another, wonder if we could just clean up next weekend instead. (Is that soon?)  Then I give the tray my full attention to peel up the last sticky, crispy, sugary bits of sweet potato.  No wonder my kids love these.

If your kids don’t get to them first, you’ll be glad to have these roasted sweet potato fries alongside a burger or sandwich of any sort, for an afternoon snack, or topping an untraditional soba or sushi rice bowl.  Or maybe, like me, you’ll find yourself eating them cold from the pan as dessert.

Baked Sweet Potato Fries: Cut sweet potatoes into batons of any size.  Place on a baking sheet and toss with olive oil and salt.  Roast at 450, checking every 10 minutes and turning them as they start to brown.  Remove when edges are crisp; smaller fries may be done before larger ones.  Total baking time depends on how thickly the sweet potatoes are cut.  Serve with ketchup, or maybe a garlicky aioli.

The Best Red Lentil Soup of 2012

It’s no secret around here that I like to cook big when I can.  A big pot of beans, a big pot of soup, a big pot of chili.  Doubling a recipe saves time and isn’t much more work than making a single recipe.  Usually when I double up, I’m feeding a crowd or making one meal for tonight’s dinner and another to freeze for another time.  But then there are occasions when I make a huge pot of something and just eat it twice a day for a week.  This soup is one of those somethings.  It’s that good.

You might think that March 2 is a little early to be declaring anything the “Best of 2012.”  But I’m pretty sure.  I’ve had a go-to red lentil soup recipe for years (it was The Best Red Lentil Soup of 2008 or thereabouts, and has held the title since).  This soup has replaced it with a vengeance.

I knew it would be good, because it was recommended to me by the same friend who gave me that amazing chilaquiles recipe.  She is a great cook and discerning recipe collector, and when she tells me to try something I always do.  This recipe is slightly adapted from 101 Cookbooks, which is another good sign, because I always like Heidi Swanson’s flavorful and sometimes quirky cooking.  In this case her stroke of genius is to add raisins to the soup, which plump up into barely-there bursting bits of sweetness mingled with the curry and coconut flavors.  In case you are feeling cautious to begin with, I will give you the regular-size recipe and you can use your discretion as to doubling it.  (You definitely will next time.)

The Best Red Lentil Soup of 2012: Bring 1 c. red lentils and 1 c. yellow split peas (both picked over and well-rinsed) to a boil in 7 c. water.  Reduce heat to a simmer, add a chopped carrot and 2 tsp. finely minced ginger (I like to grate it with my Microplane), and simmer until split peas are entirely soft, 30-45 minutes.  Meanwhile, heat a gob of coconut oil in a separate pan and saute a bunch of chopped green onions (reserve a handful for garnish) with 2 more Tbsp. minced ginger and 1/3 c. golden raisins.  After two minutes, add 2 Tbsp. Indian curry powder and saute for another minute, stirring constantly, then add 1/3 c. tomato paste and stir for one minute more.  When the lentils and peas are soft, add the tomato-spice mixture to the soup with a can of coconut milk and 2 tsp. salt.  Simmer uncovered for a bit to blend the flavors and thicken the soup; you can adjust the consistency with more water or more cooking.  Serve over cooked brown rice, garnished with those reserved chopped green onions, chopped cilantro, and a dollop of Greek yogurtIf you try this and know of a better red lentil soup recipe, please let me know in the comments.  I never get tired of lentil soup.

How to Cook Black Beans

Writing about cooking lately has made me reflect on the fact that we think that cooking is harder than it really is.  Take making a pot of beans.  Simple, really.  Beans, water, salt.  That pot will feed you for a long time.  Cooked beans freeze well.  Dried beans cost a fraction of what you pay for canned beans.  Canned foods, including beans, can contain unsafe levels of BPA as well as excessive sodium and preservatives.  And still–still!–it wasn’t until a few years ago that I started using dried beans almost exclusively.  It seemed like too much trouble to cook my own.

So it is with the zeal of a convert that I implore you to set aside a few hours some weekend to cook a pot of beans.  I’m not saying the canned kind are wrong, and I always keep a few cans in my pantry just in case, but there are so many good reasons to cook dried beans yourself.

Once you decide to make the leap, it’s hard to go wrong.  You can soak your beans, or not.  You can salt them as they cook, or wait until the end.  You can use this season’s beans from a crunchy co-op that has amazing dried bean turnover, or cook up the bag that’s been hiding in the back of the cupboard for years.  Despite the vast number of opinions on each of these topics, in my experience you can tune all that out and your beans will turn out just fine.

Ready?  Good.  First, keep an eye on your beans as you take them from the bag or jar to make sure that there are no little rocks mixed in.  Second, measure them out so you have an idea of how much salt to add later.  Finally, give them a good rinse before putting them into your pot.

I like to soak my beans only because it speeds the cooking time on the stove (and thus the actual supervision required).  You can soak your beans covered by a few inches of water overnight, or you can “quick soak” them: put them in a pot, bring it to a full boil for one minute, then turn off the heat and leave your covered pot alone for an hour.  At this point you can drain the beans, or not.  (Some claim that draining the water after an initial soak helps make the beans more digestible.  Others say you’re just pouring valuable nutrients down the drain.  No worries.  Your beans will be great either way.)

So now your black beans (soaked or unsoaked) are in your pot.  Cover the beans with a few inches of water.  (This can be the soaking water if you soaked the beans, or new water.)  Bring the pot to a boil for a few minutes, skimming off any foam that gathers, then reduce the heat to a simmer.  At this point you can leave the beans completely plain, or add any additional flavorings you’d like: some chopped onion, chopped jalapenos, dried epazote, dried oregano, crushed garlic cloves, chopped cilantro stems, whatever.  I usually make my beans rather plain, then add more flavorings later.  Leave the simmering pot partially or fully covered.  Cook for at least half an hour if you soaked the beans, or an hour if you didn’t, then taste a bean.  Once they begin to soften, add about 3/4 tsp. salt per cup of dried beans that you started with.  Continue cooking until beans are completely soft.  This may take two hours or more if you are using unsoaked beans.  (The cooking time will vary according to the beans’ freshness; even soaked beans can take nearly two hours if they are quite old.)  If the water seems to be getting low, add more boiling water.  If there is too much water when the beans are done, pour some off.  Taste the beans as you go.  If they don’t taste great to you, they probably need more salt.  Add a small amount at a time and simmer for a few minutes to let it soak in before tasting again.

Looking for ideas to use up your delicious pot of black beans?  Mix with rice, top with salsa and it’s dinnertime.  Or click the “Mexican Flavors” link on the sidebar for emmycooks recipes (like maybe these chilaquiles?) that await your black beans with open arms.Some Recipes to Show Off your Black Beans:

Black Beans with Cilantro and Lime
Chilaquiles
Vegetarian Taco Salad
Quinoa Chili with Red Peppers
Enchilada Bake with Black Beans and Tofu
Huevos Rancheros
Winter Wheat Berry Chili
Southwestern Frittata with Peppers, Black Beans, and Cheddar
Black Bean Tacos

My Favorite Recipes: February 2012

It was difficult to choose my favorite recipes from this month! My top five recipes below were all new to me this month, so they are ones that I am newly excited about. But I also cooked several of my old standbys, so make sure you scroll back through this month’s posts to find your own new favorites.Favorite Recipes Collage Feb 2012

Celebrate Spring with A Canning Jar Coddled Egg
Smoky Cauliflower Frittata (or, even simpler: Roasted Cauliflower)
Shaved Brussels Sprout Salad with Lemon, Pecorino and Red Onion
Pasta with Garlic, Anchovies, Chili and Breadcrumbs
Quick Whole Wheat Spice Bread with Brown Sugar, Orange Zest and Walnuts
And last but not least, a readers’ favorite: Eat Your Greens: Easy Handmade Spinach Pasta

Thank you for reading and cooking along with me!  And welcome to the many new readers who have joined us this month.  To receive daily recipe updates, you can subscribe to this blog via RSS or email, or follow @emmycooks on Twitter (links on the sidebar).  And special thanks to The Kitchen’s Garden Project and Cook Every Day for your recognition of emmycooks this month.

And finally, hey, maybe a recipe index would be helpful around here.  If you have created one and have any tips for me, will you please leave me a note in the comments?  Thank you!

White Bean and Spinach Soup

I’d say that in the past few months, I’ve been quite successful in my quest to stop feeding my family scrambled eggs for dinner all the time.  But I’m still not much of a planner.  Which means that the dinner hour is often neigh by the time I roll into the kitchen, wondering how our evening meal is going to materialize.

At times like these, it helps to have a well-stocked pantry.  And freezer.  This is one of those recipes that you can spend all afternoon making–or it can take 30 minutes if you keep the right ingredients in stock.  In this case, the right ingredients are an onion, a leafy green vegetable, a good vegetable broth, and some well-seasoned home-cooked white beans.  (Of course you can substitute canned beans, but you must first brown an onion, then toss in a handful of chopped garlic and sage for a few minutes, then add the beans and cover with water or vegetable broth and simmer to let the flavors blend.)

Do you cook your own beansMake your own broth?  I do, because I find the homemade versions of these things so much better and SO much cheaper than anything I can buy.  This might seem inconsistent with my professed inability to plan ahead, but I just do it every once in a while when I will be home on a Sunday afternoon: put a huge pot of beans on the stove or make eight quarts of stock.  It helps that I have a large freezer to store these things in.  What do you people do in Manhattan?  Anyway, I will start sharing recipes for some of the pantry basics that make it easier for me to get a good meal on the table quickly.  Another day.Today, White Bean and Spinach Soup: Grab a quart of good vegetable broth and a few cups of well-seasoned white beans from your freezer.  Warm the beans in a soup pot with a cup or so of broth while you saute an onion over high heat in a separate pan.  Once the onion is nearly golden and nearly caramelized, use a slotted spoon to scoop about half your beans into a blender and puree them with the onion and another cup of broth.  Add the puree to your soup pot and stir in a big bunch of chopped spinach (chard, kale, or other greens would also be great).  Simmer until the greens are tender, then thin the soup to your desired consistency with additional broth and season to taste with salt and pepper.  Serve under a shower of Parmesan shavings or a drizzle of olive oil, with crusty rolls on the side.  (The one pictured is a mini whole wheat soda bread, recipe to come after a little more experimentation.)  And what’s that gorgeous salad, you ask?  Radicchio? Endive? Apples? Blue cheese?  Oh, yes.  Hop on over to the lovely blog Salt On the Table for the full recipe.

Vegetarian Enchilada Bake with Black Beans and Tofu

The part of me that enjoys nourishing others is mightily satisfied when I make a casserole.  I know it seems stodgy, but making a heavy pan of food meant to feed a crowd is an act of love.  Maybe that’s why casseroles were so popular in the ’70s–wasn’t love in vogue back then?

We’ll call them love enchiladas, then.  Although there are lots of other good things in here, too: sweet vegetables, a good boost of protein in the black beans, tofu, and cheese, a kick of chile and spice.  But, as usual, there are no hard and fast rules.  Use what you have.

And a love note to vegans or those in a rush: the black bean/tofu/veggie mix also makes a killer taco filling.  Vegetarian Enchilada Bake with Black Beans and Tofu: To make your enchilada filling, saute a diced onion and a diced red pepper over medium-high heat until the onion begins to brown.  Add a diced zucchini, a few cloves of chopped garlic, and some corn.  Add a few pinches of salt, a tsp. dried oregano, and a couple tsp. each of cumin and chile powder.  Stir in a few cups of black beans (with their liquid if you cooked them; drained if they’re canned) and a block of diced tofu.  (If you plan in advance, you can freeze then thaw and crumble the tofu; it gives it a nice texture.)  Add some water if necessary to keep the mixture from sticking, simmer for a few minutes to blend the flavors, then taste for salt and mix in a handful of chopped cilantro at the end.  You want the mixture fairly saucy so your casserole won’t dry out while baking.  Pour a splash of enchilada sauce into a 9×13 pan (I used a prepared one this time, but if you have time it’s always worth making your own from dried chiles).  Layer your ingredients on top of the sauce as follows: corn tortillas to cover the bottom of the pan in a single layer, 1/2 of the veggie mixture, a drizzle of enchilada sauce, a sprinkling of melting cheese, a crumble of feta cheese.  The next layer is corn tortillas, 1/2 the veggie mixture, more corn tortillas, then the rest of your enchilada sauce.  Bake covered at 350 until the enchiladas are hot and bubbling (20-30 minutes if your veggie mixture started out hot), then uncover, sprinkle the top with more of both kinds of cheese, and continue baking until the cheese melts.  You can always turn on the broiler to get the top nice and brown.  Serve with brown rice, a green salad, and lots of good toppings: chopped cilantro, sliced avocado, salsa, sour cream, and some of that amazing cilantro pesto you keep in your freezer.


Roasted Maple Squash Soup

Some days you need something delicious in a hurry. Preferably something warm, if it’s February and you live in Seattle. Preferably soup.  In fact, hopefully you have some of this soup stashed in your freezer.  If you don’t now, you will soon.

This is the kind of soup that can turn you from a recipes-only cook into a confidently-winging-it cook.  It’s kind of foolproof that way.

Roasted Maple Squash Soup: Roast a winter squash.  Any winter squash.  Roast a few, while you’re at it.  Cut each in half, rub the cut sides with oil, bake face down on a rimmed sheet at 400 degrees until soft.  (Scoop out the seeds and save them in your freezer to make vegetable broth.)  Scoop the roasted flesh into a soup pot.  (Put the peel in the freezer with your seeds.  Mmm, homemade veggie broth.  That will be another post.)  Cover your squash with broth, maybe one that you’ve made yourself.  (Come to think of it, you could make a quick broth now with those seeds and peels: cover with water and add 3/4 tsp. salt per quart of water and maybe a chopped onion or some herbs, simmer 30 minutes and strain.)  So: roasted squash, broth, salt and maple syrup to taste.  Simmer, mash or puree the squash, adjust the seasonings.  Maybe that’s it.  Maybe you’re feeling indulgent?  Try a splash of cream or coconut milk.  Make sure you make some extra soup for the freezer.

Huevos Rancheros

A leisurely breakfast is a fine thing on a weekend morning.  A pot of coffee, everyone in pajamas, a few moments to putter around in the kitchen.  These are the simple pleasures.  This breakfast is one of my favorites.

In my book, the essential elements of Huevos Rancheros are tortillas, beans, eggs, cheese, and sauce.  There are many variations, but I don’t think you can go wrong.  This is not a demanding recipe.  Use what you have.  Improvise.  Someday I will make Huevos Motulenos for you, an amazing concoction featuring a fried banana.

But back to Huevos Rancheros: first warm up a pot of beans.  If you have beans left over from making Chilaquiles, or maybe even some leftover chili, you are in business (how clever of you to have made extra for the freezer!).  Or maybe you have some of those Black Beans with Cilantro and Lime in the fridge.  If not, season your beans now: saute an onion and some garlic, tip in the beans and a little salt and water, maybe with some cumin and oregano or chipotle puree, let it all simmer while you get the rest of your toppings organized, and then mash it all coarsely with some handfuls of cilantro and a big squeeze of lime.  Meanwhile, heat tortillas on a griddle (or get traditional and fry them) and fry your eggs.  Layer a warm tortilla with beans, eggs, a scattering of cheese, salsa or chile sauce, cilantro, and avocado.  You could add a dollop of sour cream.  And do you still have some of that cilantro pesto in the freezer?  Lucky you.  Enjoy your breakfast.

Roasted Cauliflower

Yesterday got me thinking about flavorful vegetarian cooking.  I have been a vegetarian (or, now, a mostly-vegetarian, with apologies to those who are offended by the concept) for my entire cooking life.  So I have never relied on meat to flavor my food.  What do I rely on?  Vegetables, heat applied to vegetables, fat, salt, spices and herbs.  I also know and revel in the range of textures and flavors that each vegetable can provide on the plate: a beet can be meltingly sweet and earthy or brightly crisp and bracingly imbued with lemon or ginger.  Fennel can be a licorice tangle of crunch, a whisper of greens in a salad, or carmelized to a sweet and savory mush that is barely haunted by anise flavor.  And I get excited every time I discover a novel way to cook a vegetable.

By way of illustrating the range of a humble vegetable, I thought I’d share a very simple but utterly delicious recipe for roasted cauliflower.  Compare it to this simple, creamy 5-ingredient Cauliflower Soup (cauliflower, onion, olive oil, water, salt).  Compare it to this Smoky Cauliflower Frittata.  You can take a cauliflower in a lot of directions.  But once it’s roasted, that’s pretty much the end of the line for a cauliflower in our house.  It often gets eaten off the sheet pan before dinner is even on the table.

Roasted Cauliflower: Chop one head of cauliflower (or two, if you want one left to put on the table with dinner) into medium florets, and chop the remaining stem into slightly smaller pieces.  If the leaves are large, chop them as well, otherwise leave them whole.  Pile onto a roasting pan, including the tiny bits–these will brown into delicious little salty bites.  Toss with olive oil and salt and roast at 450.  Turn with a tongs after 20 minutes, then every 10 minutes after that, until they are nice and brown on all sides (about 45 minutes total).  Hide from passers-by until serving.